Epson NX User Manual - Page 70
Removing the Power Supply
 |
View all Epson NX manuals
Add to My Manuals
Save this manual to your list of manuals |
Page 70 highlights
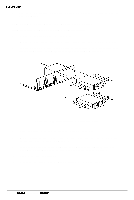
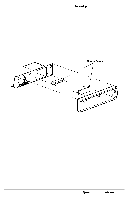
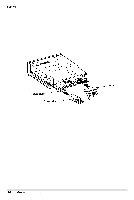
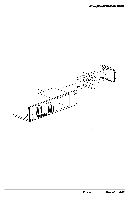
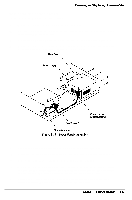
Removing and Replacing Subassemblies Removing the Power Supply Follow these steps to remove the power supply: 1 Remove the computer's cover as described on page 3-2. 2 Disconnect the power cables (connectors PA through PD) from all disk drives. Some of the cables may not be in use. 3 Disconnect the grounding wire located on the front of the chassis (see Figure 3-13). 4 Remove the two screws securing the power on/off switch to the front panel and pull the switch back toward the power supply (see Figure 3-13). 5 Remove any option cards and the option card riser board (see page 3-8). 6 Disconnect the power cable connectors PS1 and PS2 from the system board (CN13). 7 Remove the four screws securing the power supply to the rear panel. 8 Remove the two screws securing the power supply to the base of the system chassis and then the two screws attaching the power supply chassis bracket. Save all screws and the power supply chassis bracket to reinstall the power supply later. 9 Pull the power supply toward the front of the chassis until the back of the power supply has cleared the rear panel. Then lift it up and set it aside. Epson NX Service Manual 3-17
-
 1
1 -
2
-
3
-
4
-
5
-
6
-
7
-
8
-
9
-
10
-
11
-
12
-
13
-
14
-
15
-
16
-
17
-
18
-
19
-
20
-
21
-
22
-
23
-
24
-
25
-
26
-
27
-
28
-
29
-
30
-
31
-
32
-
33
-
34
-
35
-
36
-
37
-
38
-
39
-
40
-
41
-
42
-
43
-
44
-
45
-
46
-
47
-
48
-
49
-
50
-
51
-
52
-
53
-
54
-
55
-
56
-
57
-
58
-
59
-
60
-
61
-
62
-
63
-
64
-
 65
65 -
 66
66 -
 67
67 -
 68
68 -
 69
69 -
 70
70 -
 71
71 -
 72
72 -
 73
73 -
 74
74 -
 75
75 -
76
-
77
-
78
-
79
-
80
-
81
-
82
-
83
-
84
-
85
-
86
-
87
-
88
-
89
-
90
-
91
-
92
-
93
-
94
-
95
-
96
-
97
-
98
-
99
-
100
-
101
-
102
-
103
-
104
-
105
-
106
-
107
-
108
-
109
-
110
-
111
-
112
-
113
-
114
-
115
-
116
-
117
-
118
-
119
-
120
-
121
-
122
-
123
-
124
-
125
-
126
-
127
-
128
-
129
-
130
-
131
-
132
-
133
-
134
-
135
-
136
-
137
-
138
-
139
-
140
-
141
-
142
-
143
-
144
-
145
-
146
-
147
-
148
-
149
-
150
-
151
-
152
-
153
-
154
 |
 |
