Epson NX User Manual - Page 68
Removing a Hard Disk Drive From the Vertical Position, Removing/Installing a Vertical HDD
 |
View all Epson NX manuals
Add to My Manuals
Save this manual to your list of manuals |
Page 68 highlights
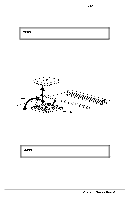
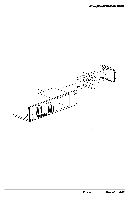
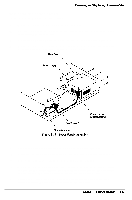
Removing and Replacing Subassemblies Removing a Hard Disk Drive From the Vertical Position Follow these steps to remove an IDE hard disk drive in the vertical position: 1 Remove the computer's cover as described on page 3-2. 2 Remove the HDD mounting bracket screw located on top of the drive bay as shown in Figure 3- 12. 3 Slide the drive toward the back of the computer and gently lift out the hard drive and its mounting bracket (the mounting bracket has tabs inserted in slots on the bottom of the system chassis). 4 Remove the four screws located on the back of the hard drive mounting bracket to remove the hard drive. Keep the screws so that you can use them to install a drive later. Figure 3-12 Removing/Installing a Vertical HDD 5 Replace the hard drive mounting bracket onto the drive bay and secure both in place with the screw removed in step 2 above. 6 Replace the cover (see page 3-4). 7 Reconfigure the system with the SETUP utility before using the computer. Epson NX Service Manual 3-15
-
 1
1 -
2
-
3
-
4
-
5
-
6
-
7
-
8
-
9
-
10
-
11
-
12
-
13
-
14
-
15
-
16
-
17
-
18
-
19
-
20
-
21
-
22
-
23
-
24
-
25
-
26
-
27
-
28
-
29
-
30
-
31
-
32
-
33
-
34
-
35
-
36
-
37
-
38
-
39
-
40
-
41
-
42
-
43
-
44
-
45
-
46
-
47
-
48
-
49
-
50
-
51
-
52
-
53
-
54
-
55
-
56
-
57
-
58
-
59
-
60
-
61
-
62
-
 63
63 -
 64
64 -
 65
65 -
 66
66 -
 67
67 -
 68
68 -
 69
69 -
 70
70 -
 71
71 -
 72
72 -
 73
73 -
74
-
75
-
76
-
77
-
78
-
79
-
80
-
81
-
82
-
83
-
84
-
85
-
86
-
87
-
88
-
89
-
90
-
91
-
92
-
93
-
94
-
95
-
96
-
97
-
98
-
99
-
100
-
101
-
102
-
103
-
104
-
105
-
106
-
107
-
108
-
109
-
110
-
111
-
112
-
113
-
114
-
115
-
116
-
117
-
118
-
119
-
120
-
121
-
122
-
123
-
124
-
125
-
126
-
127
-
128
-
129
-
130
-
131
-
132
-
133
-
134
-
135
-
136
-
137
-
138
-
139
-
140
-
141
-
142
-
143
-
144
-
145
-
146
-
147
-
148
-
149
-
150
-
151
-
152
-
153
-
154
 |
 |
