Epson NX User Manual - Page 71
Reinstalling the Power Supply, Power Supply Power Cables
 |
View all Epson NX manuals
Add to My Manuals
Save this manual to your list of manuals |
Page 71 highlights
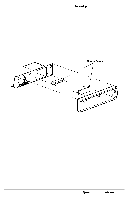
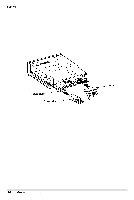
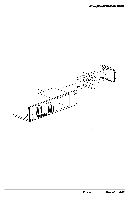
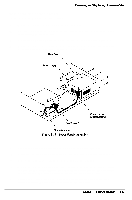
System Unit Reinstalling the Power Supply Follow these steps to reinstall the power supply: Position the main chassis so its right side is facing you. Attach the power supply chassis bracket to the power supply with two screws. Align the holes between the power supply and the rear panel and the stand-offs where the power supply chassis bracket will be secured. Using four screws, secure the power supply to the rear panel. Using two screws, secure the power supply chassis bracket to the chassis. Connect the power cables PSI and PS2 from the power supply to the system board connector CN13 (see Figure 3-14). PS2 PSl Figure 3-14 Power Supply Power Cables 7 Reinstall the option card riser board and any option cards (see page 3-8). 8 Push the power switch through the front panel and secure it in place with two screws. 9 Connect the grounding wire to the front of the chassis. 10 Connect one power cable (connectors PA through PD) to each drive in the system (see Figure 3-l 1). Some of the cables may not be in use. 11 Replace the cover (see page 3-4). 12 Connect the computer's power cable from the electrical outlet to the input receptacle located at the rear panel. Also connect any peripheral device cables that were previously disconnected from the computer, including the keyboard and mouse. 3-16 Epson NX Service Manual
-
 1
1 -
2
-
3
-
4
-
5
-
6
-
7
-
8
-
9
-
10
-
11
-
12
-
13
-
14
-
15
-
16
-
17
-
18
-
19
-
20
-
21
-
22
-
23
-
24
-
25
-
26
-
27
-
28
-
29
-
30
-
31
-
32
-
33
-
34
-
35
-
36
-
37
-
38
-
39
-
40
-
41
-
42
-
43
-
44
-
45
-
46
-
47
-
48
-
49
-
50
-
51
-
52
-
53
-
54
-
55
-
56
-
57
-
58
-
59
-
60
-
61
-
62
-
63
-
64
-
65
-
 66
66 -
 67
67 -
 68
68 -
 69
69 -
 70
70 -
 71
71 -
 72
72 -
 73
73 -
 74
74 -
 75
75 -
 76
76 -
77
-
78
-
79
-
80
-
81
-
82
-
83
-
84
-
85
-
86
-
87
-
88
-
89
-
90
-
91
-
92
-
93
-
94
-
95
-
96
-
97
-
98
-
99
-
100
-
101
-
102
-
103
-
104
-
105
-
106
-
107
-
108
-
109
-
110
-
111
-
112
-
113
-
114
-
115
-
116
-
117
-
118
-
119
-
120
-
121
-
122
-
123
-
124
-
125
-
126
-
127
-
128
-
129
-
130
-
131
-
132
-
133
-
134
-
135
-
136
-
137
-
138
-
139
-
140
-
141
-
142
-
143
-
144
-
145
-
146
-
147
-
148
-
149
-
150
-
151
-
152
-
153
-
154
 |
 |
