Epson NX User Manual - Page 75
Removing the System Board,
 |
View all Epson NX manuals
Add to My Manuals
Save this manual to your list of manuals |
Page 75 highlights
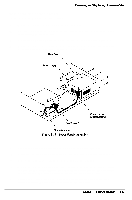
System Unit Removing the System Board Follow these steps to remove the system board: 1 Remove the cover (see page 3-2), any option cards (see page 3-5), and the option card riser board (see page 3-8). 2 Disconnect the power supply cables from CN13, any drive cables from CN6 and CN7, the speaker and LED connectors at CN3, CN11 and CN16, any VGA feature connector at CN17, and cables connected to the serial, parallel, mouse, video, and keyboard ports. 3 Remove the six screws that secure the system board to the main chassis (see Figure 3-17). Figure 3-17 Removing/Replacing the System Board 4 Pull the system board forward then tilt it up. Then pull the system board slightly toward you and lift it up and out of the chassis. Place the system board on an anti-static surface or in an anti-static bag for protection. 3-22 Epson NX Service Manual
-
 1
1 -
2
-
3
-
4
-
5
-
6
-
7
-
8
-
9
-
10
-
11
-
12
-
13
-
14
-
15
-
16
-
17
-
18
-
19
-
20
-
21
-
22
-
23
-
24
-
25
-
26
-
27
-
28
-
29
-
30
-
31
-
32
-
33
-
34
-
35
-
36
-
37
-
38
-
39
-
40
-
41
-
42
-
43
-
44
-
45
-
46
-
47
-
48
-
49
-
50
-
51
-
52
-
53
-
54
-
55
-
56
-
57
-
58
-
59
-
60
-
61
-
62
-
63
-
64
-
65
-
66
-
67
-
68
-
69
-
 70
70 -
 71
71 -
 72
72 -
 73
73 -
 74
74 -
 75
75 -
 76
76 -
 77
77 -
 78
78 -
 79
79 -
 80
80 -
81
-
82
-
83
-
84
-
85
-
86
-
87
-
88
-
89
-
90
-
91
-
92
-
93
-
94
-
95
-
96
-
97
-
98
-
99
-
100
-
101
-
102
-
103
-
104
-
105
-
106
-
107
-
108
-
109
-
110
-
111
-
112
-
113
-
114
-
115
-
116
-
117
-
118
-
119
-
120
-
121
-
122
-
123
-
124
-
125
-
126
-
127
-
128
-
129
-
130
-
131
-
132
-
133
-
134
-
135
-
136
-
137
-
138
-
139
-
140
-
141
-
142
-
143
-
144
-
145
-
146
-
147
-
148
-
149
-
150
-
151
-
152
-
153
-
154
 |
 |
