Epson NX User Manual - Page 132
Option 1, Format, To accept the default, select
 |
View all Epson NX manuals
Add to My Manuals
Save this manual to your list of manuals |
Page 132 highlights
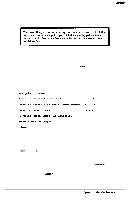
Formatting a Had Disk Option 1, Format If you select Format from the Hard Disk Format Menu, you see the following (for a disk with no defective track table): Format Hard Disk < Drive n: > Scan hard disk to get defective track information? (Y/N) (If the disk already has a defective track table, you do not see this because you do not need to scan for bad tracks.) 1 Enter Y to scan the disk or N to skip the scanning process. If you select Y, the program scans the disk and displays these messages during the process: Scanning for flagged bad tracks... Head : nnn Cylinder : nnnnn You see the head and cylinder numbers decrease as the program progresses. After scanning the disk, the program displays the results, such as the following: Scanning finished. Count of tracks flagged bad =1 Count of tracks with other errors = 0 Count of good tracks = 4884 2 Next you see the following prompt: Accept recomnended skewed sectors in format : 1 ? (Y/N) For a hard disk drive installed by Epson , it is best to accept the recommended skewed sector (also called the interleave factor) of 1, since this setting allows your drive to perform more efficiently. For other hard disk drives, you may need to change this value if the documentation that came with the disk recommends a different number. To accept the default, select Y. Then go to step 3. To enter a new value, select N. You see the following prompt: Enter new skewed sectors in format (l-16): Enter the recommended number, which equals the maximum sector number for the drive minus 1. Then press Enter. 3 Next you see this prompt: Accept recommended skewed sectors per head in format : 0 ? (Y/N) For an Epson hard disk drive, accept the recommended value of 0. For another type of drive, use the value recommended in the documentation for the drive. To accept the default, select Y. Then go to step 4. B-26 Epson NX Service Manual
-
 1
1 -
2
-
3
-
4
-
5
-
6
-
7
-
8
-
9
-
10
-
11
-
12
-
13
-
14
-
15
-
16
-
17
-
18
-
19
-
20
-
21
-
22
-
23
-
24
-
25
-
26
-
27
-
28
-
29
-
30
-
31
-
32
-
33
-
34
-
35
-
36
-
37
-
38
-
39
-
40
-
41
-
42
-
43
-
44
-
45
-
46
-
47
-
48
-
49
-
50
-
51
-
52
-
53
-
54
-
55
-
56
-
57
-
58
-
59
-
60
-
61
-
62
-
63
-
64
-
65
-
66
-
67
-
68
-
69
-
70
-
71
-
72
-
73
-
74
-
75
-
76
-
77
-
78
-
79
-
80
-
81
-
82
-
83
-
84
-
85
-
86
-
87
-
88
-
89
-
90
-
91
-
92
-
93
-
94
-
95
-
96
-
97
-
98
-
99
-
100
-
101
-
102
-
103
-
104
-
105
-
106
-
107
-
108
-
109
-
110
-
111
-
112
-
113
-
114
-
115
-
116
-
117
-
118
-
119
-
120
-
121
-
122
-
123
-
124
-
125
-
126
-
 127
127 -
 128
128 -
 129
129 -
 130
130 -
 131
131 -
 132
132 -
 133
133 -
 134
134 -
 135
135 -
 136
136 -
 137
137 -
138
-
139
-
140
-
141
-
142
-
143
-
144
-
145
-
146
-
147
-
148
-
149
-
150
-
151
-
152
-
153
-
154
 |
 |