Epson NX User Manual - Page 55
System Unit, Removing the Cover
 |
View all Epson NX manuals
Add to My Manuals
Save this manual to your list of manuals |
Page 55 highlights
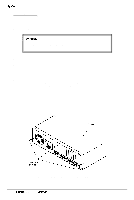
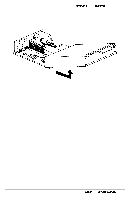
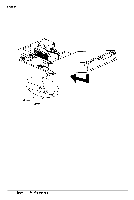
System Unit System Unit This section describes how to remove and replace the components of the main system unit. Removing the Cover WARNING Be sure to ground yourself by touching the back panel of the computer every time you remove the cover. If you are not properly grounded, you could generate an electric shock when you touch a component. Before following these instructions, read the warnings on page 3-l. Follow these steps to remove the computer's cover: 1 Turn off the computer and then any peripheral devices (including the monitor and printer). 2 Disconnect the computer's power cable from the electrical outlet and from the back panel if you plan to remove a major component. Also, disconnect any cables that are connected to the computer, including the keyboard cable. 3 If the monitor is on top of the computer, lift it off and set it to one side. 4 Turn the computer around so you are facing the back panel. 5 Remove the three retaining screws securing the cover to the back panel, as shown in Figure 3- 1. Figure 3-1 Removing the Cover Retaining Screws 3-2 Epson NX Service Manual
-
 1
1 -
2
-
3
-
4
-
5
-
6
-
7
-
8
-
9
-
10
-
11
-
12
-
13
-
14
-
15
-
16
-
17
-
18
-
19
-
20
-
21
-
22
-
23
-
24
-
25
-
26
-
27
-
28
-
29
-
30
-
31
-
32
-
33
-
34
-
35
-
36
-
37
-
38
-
39
-
40
-
41
-
42
-
43
-
44
-
45
-
46
-
47
-
48
-
49
-
 50
50 -
 51
51 -
 52
52 -
 53
53 -
 54
54 -
 55
55 -
 56
56 -
 57
57 -
 58
58 -
 59
59 -
 60
60 -
61
-
62
-
63
-
64
-
65
-
66
-
67
-
68
-
69
-
70
-
71
-
72
-
73
-
74
-
75
-
76
-
77
-
78
-
79
-
80
-
81
-
82
-
83
-
84
-
85
-
86
-
87
-
88
-
89
-
90
-
91
-
92
-
93
-
94
-
95
-
96
-
97
-
98
-
99
-
100
-
101
-
102
-
103
-
104
-
105
-
106
-
107
-
108
-
109
-
110
-
111
-
112
-
113
-
114
-
115
-
116
-
117
-
118
-
119
-
120
-
121
-
122
-
123
-
124
-
125
-
126
-
127
-
128
-
129
-
130
-
131
-
132
-
133
-
134
-
135
-
136
-
137
-
138
-
139
-
140
-
141
-
142
-
143
-
144
-
145
-
146
-
147
-
148
-
149
-
150
-
151
-
152
-
153
-
154
 |
 |
