Epson NX User Manual - Page 60
Installing an Option Card, the option card instructions. When handling the card
 |
View all Epson NX manuals
Add to My Manuals
Save this manual to your list of manuals |
Page 60 highlights
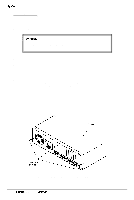
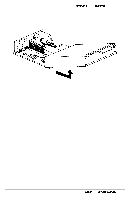
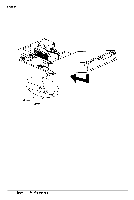
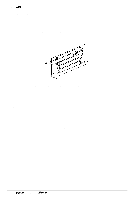
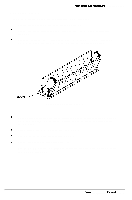
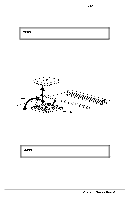
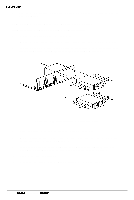
Removing and Replacing Subassemblies Installing an Option Card The computer has four 16-bit option slots located on the option card connector board and accommodates up to four option cards. (The Epson NX comes with a network card in one option slot, and some configurations may have a SCSI interface in another slot.) An option card can occupy any slot. For example, an 8-bit card can be installed in a 16-bit slot. However, the following restrictions apply: 0 If an 8-bit card has an additional tab along the bottom, it will interfere with the option slot connector and will not fit. 0 If a disk drive controller card is installed, place the card in one of the lower slots, so the drive cable will not be in the way when replacing the computer's cover. 0 If a high-resolution graphics adapter card is installed, place the card in one of the lower slots, so the cable will reach the VGA feature connector (CN17) on the system board. Consult the instructions that come with the card for further instructions. Note Before installing an option card, check to see if any jumper settings on the main system board need to be changed. For example, if installing a mouse interface card, the settings of jumpers J9 and J12 need to be changed. If installing a video card, the settings of jumpers Jl0 or Jl 1 may need to change. See page l-l2 for more information on jumper settings. Follow these steps to install an option card that has been removed or to add a new option card in the computer: 1 Remove the computer's cover as described on page 3-2. 2 Remove the option slot cover as described on page 3-6. 3 Unpack the option card and adjust any switches or jumpers on it, if necessary. (Check the option card instructions.) When handling the card, be careful not to touch any of the components on the circuit board or the gold-plated connectors. If you need to set it down before you install it, place it gently on top of its original packing material with the component side facing up. Keep the packing materials in case the card is removed later. 4 Hold the card along the top corners and guide it into the connector as shown in Figure 3-4. If installing a full-length card insert the front edge of the card into the corresponding guide inside the computer's front panel. 5 Once the connectors reach the slot, push the card in firmly to insert it fully. If it does not go in smoothly, do not force it; pull the card all the way out and try again. 6 Secure the end of the card to the computer's option slot with the retaining screw that once held the option slot cover. 7 Follow the instructions on page 3-4 to replace the computer's cover. Epson NX Service Manual 3-7
-
 1
1 -
2
-
3
-
4
-
5
-
6
-
7
-
8
-
9
-
10
-
11
-
12
-
13
-
14
-
15
-
16
-
17
-
18
-
19
-
20
-
21
-
22
-
23
-
24
-
25
-
26
-
27
-
28
-
29
-
30
-
31
-
32
-
33
-
34
-
35
-
36
-
37
-
38
-
39
-
40
-
41
-
42
-
43
-
44
-
45
-
46
-
47
-
48
-
49
-
50
-
51
-
52
-
53
-
54
-
 55
55 -
 56
56 -
 57
57 -
 58
58 -
 59
59 -
 60
60 -
 61
61 -
 62
62 -
 63
63 -
 64
64 -
 65
65 -
66
-
67
-
68
-
69
-
70
-
71
-
72
-
73
-
74
-
75
-
76
-
77
-
78
-
79
-
80
-
81
-
82
-
83
-
84
-
85
-
86
-
87
-
88
-
89
-
90
-
91
-
92
-
93
-
94
-
95
-
96
-
97
-
98
-
99
-
100
-
101
-
102
-
103
-
104
-
105
-
106
-
107
-
108
-
109
-
110
-
111
-
112
-
113
-
114
-
115
-
116
-
117
-
118
-
119
-
120
-
121
-
122
-
123
-
124
-
125
-
126
-
127
-
128
-
129
-
130
-
131
-
132
-
133
-
134
-
135
-
136
-
137
-
138
-
139
-
140
-
141
-
142
-
143
-
144
-
145
-
146
-
147
-
148
-
149
-
150
-
151
-
152
-
153
-
154
 |
 |