Epson NX User Manual - Page 133
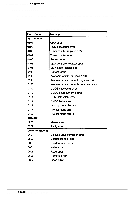
the track data or, to delete the track from the table. Change the track data in the same way
 |
View all Epson NX manuals
Add to My Manuals
Save this manual to your list of manuals |
Page 133 highlights
System Utilities To enter a new value, select N. You see the following prompt: Enter new skewed sectors per head in format (O-16): Enter the recommended number, which equals the maximum sector number for the drive minus 1. The maximum sector number varies, depending on the drive type. Then press Enter. 4 The program now allows you to edit the defective track table. At the bottom of the table is this prompt: Modify defective track table ? (Y/N) Select N if you want to leave the table as it is. Then skip the next section and go to "Formatting the Disk" on page B-28. To add bad tracks to the defective track table, see the next section. Modifying the Defective Track Table If you select Y to modify the table, you see the following options at the bottom of the table: Defective Track Table : Move box cursor to desired track with cursor key A I Add track, C I Change track, D = Delete track, F = Finish editing Enter command: To add a bad track, follow these steps: 1 Press A. You see this prompt: Enter cylinder number (1 -nnnn): 2 Type the number of the cylinder containing the bad track and press Enter. You see this prompt: Enter head number (0 - nn): 3 Type the head number for the bad track and press Enter. (To cancel the operation, press Enter without typing a value.) When you complete a valid entry, it appears in the table and you can add the next bad track, if necessary. If you make a mistake, move the cursor block to the incorrect track and press C to change the track data or D to delete the track from the table. Change the track data in the same way as you add a track The maximum valid cylinder number and head number (nnnn and nn) vary according to the capacity of the hard disk If you enter an invalid cylinder or head number, a reminder of the range of values appears and the program asks you to enter the value again. When you finish adding all the bad tracks, press Enter without typing a value. Then check the entries in the defective track table. When you are sure the table is correct, press F. The program displays a warning about the consequences of proceeding with formatting, as described in the next section. Epson NX Service Manual B-27
-
 1
1 -
2
-
3
-
4
-
5
-
6
-
7
-
8
-
9
-
10
-
11
-
12
-
13
-
14
-
15
-
16
-
17
-
18
-
19
-
20
-
21
-
22
-
23
-
24
-
25
-
26
-
27
-
28
-
29
-
30
-
31
-
32
-
33
-
34
-
35
-
36
-
37
-
38
-
39
-
40
-
41
-
42
-
43
-
44
-
45
-
46
-
47
-
48
-
49
-
50
-
51
-
52
-
53
-
54
-
55
-
56
-
57
-
58
-
59
-
60
-
61
-
62
-
63
-
64
-
65
-
66
-
67
-
68
-
69
-
70
-
71
-
72
-
73
-
74
-
75
-
76
-
77
-
78
-
79
-
80
-
81
-
82
-
83
-
84
-
85
-
86
-
87
-
88
-
89
-
90
-
91
-
92
-
93
-
94
-
95
-
96
-
97
-
98
-
99
-
100
-
101
-
102
-
103
-
104
-
105
-
106
-
107
-
108
-
109
-
110
-
111
-
112
-
113
-
114
-
115
-
116
-
117
-
118
-
119
-
120
-
121
-
122
-
123
-
124
-
125
-
126
-
127
-
 128
128 -
 129
129 -
 130
130 -
 131
131 -
 132
132 -
 133
133 -
 134
134 -
 135
135 -
 136
136 -
 137
137 -
 138
138 -
139
-
140
-
141
-
142
-
143
-
144
-
145
-
146
-
147
-
148
-
149
-
150
-
151
-
152
-
153
-
154
 |
 |
