Epson PowerLite Pro G5350 Operation Guide - EasyMP - Page 5
Installing the Software, Software Supplied, Installing
 |
View all Epson PowerLite Pro G5350 manuals
Add to My Manuals
Save this manual to your list of manuals |
Page 5 highlights
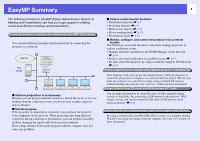
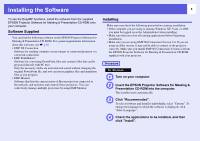
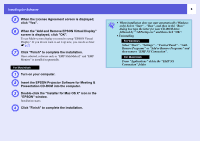
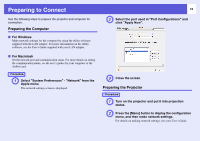
Installing the Software 5 To use the EasyMP functions, install the software from the supplied EPSON Projector Software for Meeting & Presentation CD-ROM onto your computer. Software Supplied You can find the following software on the EPSON Projector Software for Meeting & Presentation CD-ROM. For system requirements information about this software, see s p.92. • EMP NS Connection Software for sending computer screen images to connected projector via a network connection. • EMP SlideMaker2 Software for converting PowerPoint files into scenario files that can be projected directly with PC Free. Only the necessary slides are extracted and sorted without changing the original PowerPoint file, and you can insert graphics files and animation files as you progress. • EMP Monitor Software that lists the current status of Epson projectors connected to the network, and monitors and controls those projectors. You can collectively manage multiple projectors by using EMP Monitor. Installing Make sure you check the following points before starting installation. • If the computer you are using is running Windows XP, Vista, or 2000 you must be logged on as the Administrator when installing. • Make sure that you close all running applications before beginning installation. • Make sure you are using EMP NS Connection Version 2.4. If you are using an older version, it may not be able to connect to the projector correctly. Make sure you install EMP NS Connection Version 2.4 from the EPSON Projector Software for Meeting & Presentation CD-ROM supplied with your projector. Procedure For Windows A Turn on your computer. B Insert the EPSON Projector Software for Meeting & Presentation CD-ROM into the computer. The installer starts automatically. C Click "Recommended". To select software and install it individually, select "Custom". To change the language in which the software is displayed, click "Select Language". D Check the applications to be installed, and then click "Install".
-
 1
1 -
 2
2 -
 3
3 -
 4
4 -
 5
5 -
 6
6 -
 7
7 -
 8
8 -
 9
9 -
 10
10 -
 11
11 -
12
-
13
-
14
-
15
-
16
-
17
-
18
-
19
-
20
-
21
-
22
-
23
-
24
-
25
-
26
-
27
-
28
-
29
-
30
-
31
-
32
-
33
-
34
-
35
-
36
-
37
-
38
-
39
-
40
-
41
-
42
-
43
-
44
-
45
-
46
-
47
-
48
-
49
-
50
-
51
-
52
-
53
-
54
-
55
-
56
-
57
-
58
-
59
-
60
-
61
-
62
-
63
-
64
-
65
-
66
-
67
-
68
-
69
-
70
-
71
-
72
-
73
-
74
-
75
-
76
-
77
-
78
-
79
-
80
-
81
-
82
-
83
-
84
-
85
-
86
-
87
-
88
-
89
-
90
-
91
-
92
-
93
-
94
-
95
-
96
-
97
-
98
-
99
-
100
-
101
-
102
-
103
-
104
 |
 |
