Epson PowerLite Pro G5350 Operation Guide - EasyMP - Page 75
Sending Scenarios
 |
View all Epson PowerLite Pro G5350 manuals
Add to My Manuals
Save this manual to your list of manuals |
Page 75 highlights
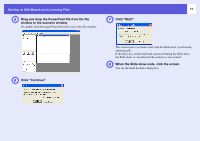
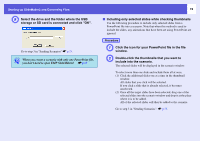
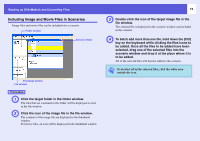
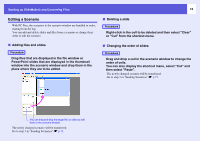
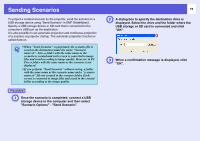
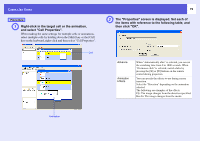
Sending Scenarios To project a created scenario by the projector, send the scenario to a USB storage device using "Send Scenario" in EMP SlideMaker2. Specify a USB storage device or SD card that is connected to the computer's USB port as the destination. It is also possible to set automatic projection and continuous projection of a scenario at projector startup. The automatic projection function is called Autorun. q • When "Send Scenario" is performed, the scenario file is saved in the destination under the name "Scenario name.sit". Also, a folder with the same name as the scenario is created and each screen is converted to image files and saved according to image quality. However, in PC Free a folder with the same name as the scenario is not displayed. • If you perform "Send Scenario" without saving, a folder with the same name as the scenario name and a "scenario name.sit" file are created in the scenario folder. Each screen is converted to image files and saved in the created folder according to the image quality. Procedure A Once the scenario is completed, connect a USB storage device to the computer and then select "Scenario Options" - "Send Scenario". 75 B A dialog box to specify the destination drive is displayed. Select the drive and the folder where the USB storage or SD card is connected and click "OK". C When a confirmation message is displayed, click "OK".
-
 1
1 -
2
-
3
-
4
-
5
-
6
-
7
-
8
-
9
-
10
-
11
-
12
-
13
-
14
-
15
-
16
-
17
-
18
-
19
-
20
-
21
-
22
-
23
-
24
-
25
-
26
-
27
-
28
-
29
-
30
-
31
-
32
-
33
-
34
-
35
-
36
-
37
-
38
-
39
-
40
-
41
-
42
-
43
-
44
-
45
-
46
-
47
-
48
-
49
-
50
-
51
-
52
-
53
-
54
-
55
-
56
-
57
-
58
-
59
-
60
-
61
-
62
-
63
-
64
-
65
-
66
-
67
-
68
-
69
-
 70
70 -
 71
71 -
 72
72 -
 73
73 -
 74
74 -
 75
75 -
 76
76 -
 77
77 -
 78
78 -
 79
79 -
 80
80 -
81
-
82
-
83
-
84
-
85
-
86
-
87
-
88
-
89
-
90
-
91
-
92
-
93
-
94
-
95
-
96
-
97
-
98
-
99
-
100
-
101
-
102
-
103
-
104
 |
 |