Epson PowerLite Pro G5350 Operation Guide - EasyMP - Page 76
When using Autorun, Remove the USB storage device or SD card from
 |
View all Epson PowerLite Pro G5350 manuals
Add to My Manuals
Save this manual to your list of manuals |
Page 76 highlights
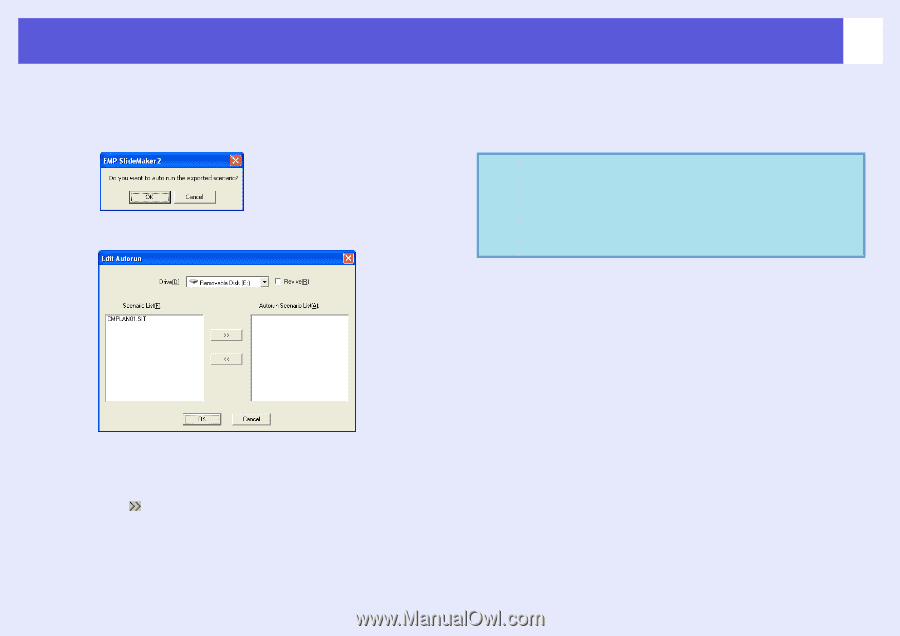
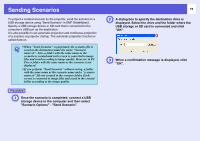
Sending Scenarios D When transfer is complete, a message is displayed confirming whether to perform autorun setup. If you want to set autorun, click "OK" and continue with step 5. Otherwise, click "Cancel" and skip to step 7. All scenario files within the destination drive are displayed in the scenario list on the left in the format "Folder name/File name". E When using Autorun To set a scenario to run automatically when the projector power is turned on, click the target scenario name in the scenario list, and click " ". The scenario is displayed in the autorun scenario list on the right and set as an autorun file. A scenario file in a folder with deep hierarchy or with a long folder name cannot be selected. 76 When projecting a scenario repeatedly To start projecting from the first scenario again once projection of all scenarios in the "Autorun Scenario List" is complete, select "Revive" check box. q • Autorun can also be set by selecting "Scenario Option" "Edit Autorun". • Autorun setting cannot be specified in EasyMP for PC Free. • If there are two or more files set for autorun, they are played back in order from the top on the "Autorun Scenario List". F When the scenario for autorun is set, click "OK". G Remove the USB storage device or SD card from the computer. See the computer's user's guide for the removal method. H After finishing transferring your scenario, connect the USB storage device or SD card to the projector and start projection using PC Free. s p.51
-
 1
1 -
2
-
3
-
4
-
5
-
6
-
7
-
8
-
9
-
10
-
11
-
12
-
13
-
14
-
15
-
16
-
17
-
18
-
19
-
20
-
21
-
22
-
23
-
24
-
25
-
26
-
27
-
28
-
29
-
30
-
31
-
32
-
33
-
34
-
35
-
36
-
37
-
38
-
39
-
40
-
41
-
42
-
43
-
44
-
45
-
46
-
47
-
48
-
49
-
50
-
51
-
52
-
53
-
54
-
55
-
56
-
57
-
58
-
59
-
60
-
61
-
62
-
63
-
64
-
65
-
66
-
67
-
68
-
69
-
70
-
 71
71 -
 72
72 -
 73
73 -
 74
74 -
 75
75 -
 76
76 -
 77
77 -
 78
78 -
 79
79 -
 80
80 -
 81
81 -
82
-
83
-
84
-
85
-
86
-
87
-
88
-
89
-
90
-
91
-
92
-
93
-
94
-
95
-
96
-
97
-
98
-
99
-
100
-
101
-
102
-
103
-
104
 |
 |