Epson R340 Printer Basics - Page 28
Adjusting the Printing Position, Printing on CDs and DVDs, Print Setting., Start, Setup
 |
UPC - 010343855632
View all Epson R340 manuals
Add to My Manuals
Save this manual to your list of manuals |
Page 28 highlights
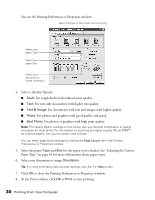
2. If you want to change the layout settings, press Print Setting. Press d or u to select the following options: 1-up 4-up 8-up 12-up One photo is printed on the CD/DVD, centered. Four photos are printed on the CD/DVD, with one photo in each quarter. 8 photos are printed on the CD/DVD, arranged in a circle. 12 photos are printed on the CD/DVD, arranged in a circle. Note: All photos are printed in landscape mode. 3. Press l or r to choose a photo. Press u to choose 1 for the Copies setting. This will print 1 copy of the selected photo on your CD. (If you want to print multiple photos, change the Layout setting first, as described below, then repeat this step for each photo you want to add to your CD/DVD layout.) 4. Press the Print Settings button and choose additional print settings (see page 21). 5. Press the x Start button to print your photos. Note: To cancel printing, press the y Stop button. Adjusting the Printing Position If your photo is not centered on the CD or DVD, you may need to adjust the print position. 1. Press the Setup button. 2. Select CD/DVD Position Up/Down or CD/DVD Position Left/Right, then press the r button. Printing on CDs and DVDs 27
-
 1
1 -
2
-
3
-
4
-
5
-
6
-
7
-
8
-
9
-
10
-
11
-
12
-
13
-
14
-
15
-
16
-
17
-
18
-
19
-
20
-
21
-
22
-
 23
23 -
 24
24 -
 25
25 -
 26
26 -
 27
27 -
 28
28 -
 29
29 -
 30
30 -
 31
31 -
 32
32 -
 33
33 -
34
-
35
-
36
-
37
-
38
-
39
-
40
-
41
-
42
-
43
-
44
-
45
-
46
-
47
-
48
-
49
-
50
-
51
-
52
-
53
-
54
-
55
-
56
-
57
-
58
-
59
-
60
-
61
-
62
-
63
-
64
-
65
-
66
-
67
-
68
-
69
-
70
-
71
-
72
-
73
-
74
-
75
-
76
-
77
-
78
-
79
-
80
-
81
 |
 |
