Epson R340 Printer Basics - Page 46
Maintaining Your Printer, Cleaning the Print Head - driver
 |
UPC - 010343855632
View all Epson R340 manuals
Add to My Manuals
Save this manual to your list of manuals |
Page 46 highlights
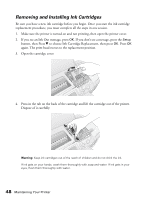
Maintaining Your Printer This chapter describes maintenance procedures to keep your printer working its best and preparation steps for moving your printer. Follow the instructions here for: ■ "Cleaning the Print Head" below ■ "Replacing an Ink Cartridge" on page 47 ■ "Aligning the Print Head" on page 50 ■ "Cleaning the Printer" on page 50 ■ "Transporting the Printer" on page 51 ■ "Adjusting the LCD Brightness" on page 52 Note: You can also maintain your printer from the Maintenance tab on your driver (Windows) or from the Epson Printer Utility (Macintosh). For details, read your on-screen User's Guide (described on page 8). Cleaning the Print Head If your printouts are unexpectedly light or faint, or dots or lines are missing from the image, you may need to clean the print head. This unclogs the nozzles so they can deliver ink properly. Print head cleaning uses ink, so clean it only if quality declines. You can clean the print head either from the printer's control panel or using your printer software. To clean it using the printer software, the printer must be connected directly to your computer (not over a network); see your on-screen User's Guide for details. Caution: When you don't turn on your printer for a long time, the print quality can decline, so turn it on at least once a month to maintain good print quality. Follow these steps to clean the print head from the printer's control panel: 1. Make sure the printer is turned on but not printing. 2. Press the Setup button. 3. Press d to highlight Head Cleaning, then press OK. 45
-
 1
1 -
2
-
3
-
4
-
5
-
6
-
7
-
8
-
9
-
10
-
11
-
12
-
13
-
14
-
15
-
16
-
17
-
18
-
19
-
20
-
21
-
22
-
23
-
24
-
25
-
26
-
27
-
28
-
29
-
30
-
31
-
32
-
33
-
34
-
35
-
36
-
37
-
38
-
39
-
40
-
 41
41 -
 42
42 -
 43
43 -
 44
44 -
 45
45 -
 46
46 -
 47
47 -
 48
48 -
 49
49 -
 50
50 -
 51
51 -
52
-
53
-
54
-
55
-
56
-
57
-
58
-
59
-
60
-
61
-
62
-
63
-
64
-
65
-
66
-
67
-
68
-
69
-
70
-
71
-
72
-
73
-
74
-
75
-
76
-
77
-
78
-
79
-
80
-
81
 |
 |
