Epson R340 Printer Basics - Page 50
Close the ink cartridge cover., and close the printer cover. - cartridges
 |
UPC - 010343855632
View all Epson R340 manuals
Add to My Manuals
Save this manual to your list of manuals |
Page 50 highlights
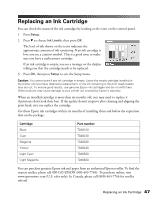
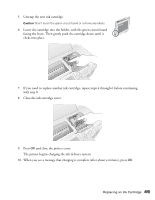
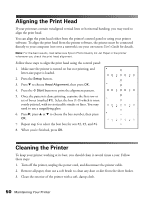
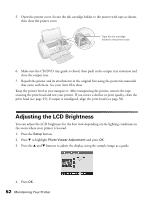
5. Unwrap the new ink cartridge. Caution: Don't touch the green circuit board or remove any labels. 6. Lower the cartridge into the holder, with the green circuit board facing the front. Then gently push the cartridge down until it clicks into place. 7. If you need to replace another ink cartridge, repeat steps 4 through 6 before continuing with step 8. 8. Close the ink cartridge cover. 9. Press OK and close the printer cover. The printer begins charging the ink delivery system. 10. When you see a message that charging is complete (after about a minute), press OK. Replacing an Ink Cartridge 49
-
 1
1 -
2
-
3
-
4
-
5
-
6
-
7
-
8
-
9
-
10
-
11
-
12
-
13
-
14
-
15
-
16
-
17
-
18
-
19
-
20
-
21
-
22
-
23
-
24
-
25
-
26
-
27
-
28
-
29
-
30
-
31
-
32
-
33
-
34
-
35
-
36
-
37
-
38
-
39
-
40
-
41
-
42
-
43
-
44
-
 45
45 -
 46
46 -
 47
47 -
 48
48 -
 49
49 -
 50
50 -
 51
51 -
 52
52 -
 53
53 -
 54
54 -
 55
55 -
56
-
57
-
58
-
59
-
60
-
61
-
62
-
63
-
64
-
65
-
66
-
67
-
68
-
69
-
70
-
71
-
72
-
73
-
74
-
75
-
76
-
77
-
78
-
79
-
80
-
81
 |
 |

Replacing an Ink Cartridge
49
5.
Unwrap the new ink cartridge.
Caution:
Don’t touch the green circuit board or remove any labels.
6.
Lower the cartridge into the holder, with the green circuit board
facing the front. Then gently push the cartridge down until it
clicks into place.
7.
If you need to replace another ink cartridge, repeat steps 4 through 6 before continuing
with step 8.
8.
Close the ink cartridge cover.
9.
Press
OK
and close the printer cover.
The printer begins charging the ink delivery system.
10.
When you see a message that charging is complete (after about a minute), press
OK
.