Epson R340 Printer Basics - Page 41
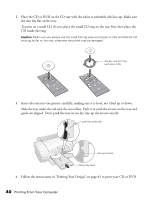
Slide the tray under the tab and the two rollers. Push it in until the arrows on the tray
 |
UPC - 010343855632
View all Epson R340 manuals
Add to My Manuals
Save this manual to your list of manuals |
Page 41 highlights
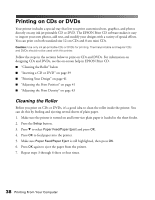
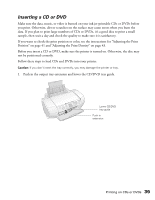
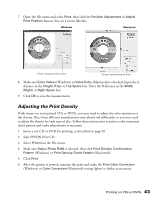
2. Place the CD or DVD on the CD tray with the white or printable side face-up. Make sure the disc lies flat on the tray. To print on a small CD (8-cm), place the small CD ring on the tray first, then place the CD inside the ring. Caution: Make sure you always use the small CD ring when printing 8-cm CDs and that the CD and ring lie flat on the tray; otherwise the printer may be damaged. Always use this ring with 8-cm CDs 3. Insert the tray into the printer carefully, making sure it is level, not tilted up or down. Slide the tray under the tab and the two rollers. Push it in until the arrows on the tray and guide are aligned. Don't push the tray in too far; line up the arrows exactly. Load tray under tab Line up arrows Keep tray level 4. Follow the instructions in "Printing Your Design" on page 41 to print your CD or DVD. 40 Printing From Your Computer
-
 1
1 -
2
-
3
-
4
-
5
-
6
-
7
-
8
-
9
-
10
-
11
-
12
-
13
-
14
-
15
-
16
-
17
-
18
-
19
-
20
-
21
-
22
-
23
-
24
-
25
-
26
-
27
-
28
-
29
-
30
-
31
-
32
-
33
-
34
-
35
-
 36
36 -
 37
37 -
 38
38 -
 39
39 -
 40
40 -
 41
41 -
 42
42 -
 43
43 -
 44
44 -
 45
45 -
 46
46 -
47
-
48
-
49
-
50
-
51
-
52
-
53
-
54
-
55
-
56
-
57
-
58
-
59
-
60
-
61
-
62
-
63
-
64
-
65
-
66
-
67
-
68
-
69
-
70
-
71
-
72
-
73
-
74
-
75
-
76
-
77
-
78
-
79
-
80
-
81
 |
 |
