Epson R340 Printer Basics - Page 60
Print Quality Problems
 |
UPC - 010343855632
View all Epson R340 manuals
Add to My Manuals
Save this manual to your list of manuals |
Page 60 highlights
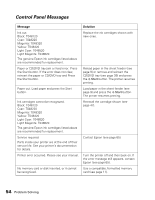
Print Quality Problems You see banding (light lines). ■ The print head nozzles may need cleaning; see page 45 for instructions. ■ Select a higher print quality and turn off High Speed mode. See page 29 (Windows) or page 31 (Macintosh). ■ If you're printing without a computer, make sure the printer's Paper Type setting matches the type of paper you're using; see page 20 for guidelines. ■ If you're printing from a computer, make sure the paper Type or Media Type setting matches the paper you loaded; see page 34 for guidelines. ■ Make sure you load paper with the printable side face up. The printable side is usually the whiter or brighter side of the paper. ■ The ink cartridges may need replacing. To replace an ink cartridge, see page 47. ■ Run the Print Head Alignment utility; see page 50 for instructions. Your printout is blurry or smeared. ■ Use Epson papers to ensure proper saturation and absorption of genuine Epson inks. ■ Make sure you load paper with the printable side face up. The printable side is usually the whiter or brighter side of the paper. ■ Make sure your paper isn't damp or curled, or loaded face down (the printable side should be face up). If it's damp or curled, reload a new stack of paper. ■ When printing on special paper, check the instructions in the paper package. You may need to use an included support sheet or load your paper one sheet at a time. ■ Make sure your paper meets the specifications listed in the on-screen User's Guide. ■ Run the Print Head Alignment utility; see page 50 for instructions. ■ Remove each sheet from the output tray after printing, especially when you're printing on transparencies. ■ If the options above don't work, try using the thick paper and envelopes setting: Windows: From the Maintenance tab in the Printing Properties or Preferences window, click Printer and Option Information, then select Thick paper and envelopes. Mac OS X: From the Print window, choose Extension Settings in the pop-up menu, then select Thick paper and envelopes. Print Quality Problems 59
-
 1
1 -
2
-
3
-
4
-
5
-
6
-
7
-
8
-
9
-
10
-
11
-
12
-
13
-
14
-
15
-
16
-
17
-
18
-
19
-
20
-
21
-
22
-
23
-
24
-
25
-
26
-
27
-
28
-
29
-
30
-
31
-
32
-
33
-
34
-
35
-
36
-
37
-
38
-
39
-
40
-
41
-
42
-
43
-
44
-
45
-
46
-
47
-
48
-
49
-
50
-
51
-
52
-
53
-
54
-
 55
55 -
 56
56 -
 57
57 -
 58
58 -
 59
59 -
 60
60 -
 61
61 -
 62
62 -
 63
63 -
 64
64 -
 65
65 -
66
-
67
-
68
-
69
-
70
-
71
-
72
-
73
-
74
-
75
-
76
-
77
-
78
-
79
-
80
-
81
 |
 |