Epson R340 Printer Basics - Page 43
Printing From Your Computer, Stylus Photo R340, Print Position Confirmation, Pattern
 |
UPC - 010343855632
View all Epson R340 manuals
Add to My Manuals
Save this manual to your list of manuals |
Page 43 highlights
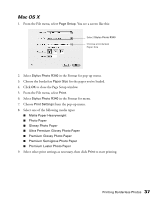
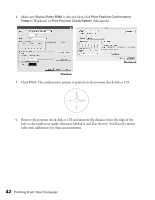
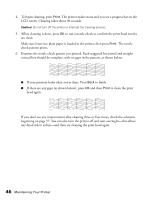
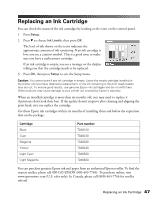
4. Make sure Stylus Photo R340 is selected, then click Print Position Confirmation Pattern (Windows) or Print Position Check Pattern (Macintosh). Macintosh Windows 5. Click Print. The confirmation pattern is printed on the position check disk or CD. 6. Remove the position check disk or CD and measure the distance from the edge of the hole to the small cross marks (distances labeled A and B as shown). You'll need a metric ruler with millimeters for these measurements. 42 Printing From Your Computer
-
 1
1 -
2
-
3
-
4
-
5
-
6
-
7
-
8
-
9
-
10
-
11
-
12
-
13
-
14
-
15
-
16
-
17
-
18
-
19
-
20
-
21
-
22
-
23
-
24
-
25
-
26
-
27
-
28
-
29
-
30
-
31
-
32
-
33
-
34
-
35
-
36
-
37
-
 38
38 -
 39
39 -
 40
40 -
 41
41 -
 42
42 -
 43
43 -
 44
44 -
 45
45 -
 46
46 -
 47
47 -
 48
48 -
49
-
50
-
51
-
52
-
53
-
54
-
55
-
56
-
57
-
58
-
59
-
60
-
61
-
62
-
63
-
64
-
65
-
66
-
67
-
68
-
69
-
70
-
71
-
72
-
73
-
74
-
75
-
76
-
77
-
78
-
79
-
80
-
81
 |
 |

42
Printing From Your Computer
4.
Make sure
Stylus Photo R340
is selected, then click
Print Position Confirmation
Pattern
(Windows) or
Print Position Check Pattern
(Macintosh).
5.
Click
Print
. The confirmation pattern is printed on the position check disk or CD.
6.
Remove the position check disk or CD and measure the distance from the edge of the
hole to the small cross marks (distances labeled A and B as shown). You’ll need a metric
ruler with millimeters for these measurements.
Macintosh
Windows