Fujitsu 6670 Operator's Guide - Page 106
Customizing the Hardware Settings, Using the Scanner Buttons to Start A Scan Quickly, Quickly
 |
UPC - 097564307454
View all Fujitsu 6670 manuals
Add to My Manuals
Save this manual to your list of manuals |
Page 106 highlights
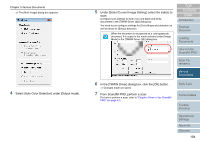
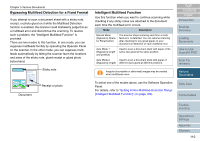
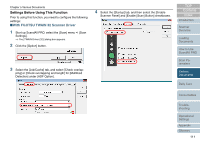
Chapter 5 Various Documents 5.5 Customizing the Hardware Settings Using the Scanner Buttons to Start A Scan Quickly 6 Select the [Events] tab, and then select an event from [Select an event]. You can perform a scan simply by pressing the [Scan/Stop] or [Send to] button on the scanner. To do this, you first need to assign your desired scanning applications to these buttons. Computer Settings 1 Confirm that the scanner is connected properly to your computer, then power on the scanner. For how to connect the scanner to your computer, refer to "Chapter 3 Connecting the Cables" in the Getting Started. 2 Select the [start] menu D [Control Panel]. ⇒ The [Control Panel] window appears. 3 Select the [Hardware and Sound] icon. ⇒ The [Hardware and Sound] window appears. 4 Select the [Scanners and Cameras] icon. ⇒ The [Scanners and Cameras] window appears. 5 Display the properties of the scanner. Double-click the [fi-6670dj], [fi-6770dj], or [fi-6750Sj] icon. The following events can be selected: • "Scan Button" (when the [Scan/Stop] button is pressed) • "Send to 1" to "Send to 9" (when the [Send to] button is pressed while a number (from 1 to 9) is displayed on the Function Number Display) TOP Contents Index Introduction Scanner Overview Loading Documents How to Use ScandAll PRO Scan Parameters Various Documents Daily Care Consumables Troubleshooting Operational Settings Appendix Glossary 106
-
 1
1 -
2
-
3
-
4
-
5
-
6
-
7
-
8
-
9
-
10
-
11
-
12
-
13
-
14
-
15
-
16
-
17
-
18
-
19
-
20
-
21
-
22
-
23
-
24
-
25
-
26
-
27
-
28
-
29
-
30
-
31
-
32
-
33
-
34
-
35
-
36
-
37
-
38
-
39
-
40
-
41
-
42
-
43
-
44
-
45
-
46
-
47
-
48
-
49
-
50
-
51
-
52
-
53
-
54
-
55
-
56
-
57
-
58
-
59
-
60
-
61
-
62
-
63
-
64
-
65
-
66
-
67
-
68
-
69
-
70
-
71
-
72
-
73
-
74
-
75
-
76
-
77
-
78
-
79
-
80
-
81
-
82
-
83
-
84
-
85
-
86
-
87
-
88
-
89
-
90
-
91
-
92
-
93
-
94
-
95
-
96
-
97
-
98
-
99
-
100
-
 101
101 -
 102
102 -
 103
103 -
 104
104 -
 105
105 -
 106
106 -
 107
107 -
 108
108 -
 109
109 -
 110
110 -
 111
111 -
112
-
113
-
114
-
115
-
116
-
117
-
118
-
119
-
120
-
121
-
122
-
123
-
124
-
125
-
126
-
127
-
128
-
129
-
130
-
131
-
132
-
133
-
134
-
135
-
136
-
137
-
138
-
139
-
140
-
141
-
142
-
143
-
144
-
145
-
146
-
147
-
148
-
149
-
150
-
151
-
152
-
153
-
154
-
155
-
156
-
157
-
158
-
159
-
160
-
161
-
162
-
163
-
164
-
165
-
166
-
167
-
168
-
169
-
170
-
171
-
172
-
173
-
174
-
175
-
176
-
177
-
178
-
179
-
180
-
181
-
182
-
183
-
184
-
185
-
186
-
187
-
188
-
189
-
190
-
191
-
192
-
193
-
194
-
195
-
196
-
197
-
198
-
199
-
200
-
201
-
202
-
203
-
204
-
205
-
206
-
207
-
208
-
209
-
210
-
211
-
212
 |
 |
