Fujitsu Fi-5110EOX2 Operating Guide - Page 32
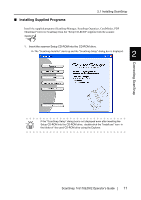
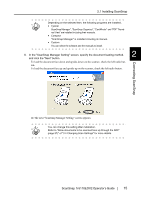
This displays the Start Copying Files screen., click the [Next] button.
 |
View all Fujitsu Fi-5110EOX2 manuals
Add to My Manuals
Save this manual to your list of manuals |
Page 32 highlights
6. In the "Choose Destination Location" screen, choose the installation directory and click the [Next] button. To install ScanSnap in the displayed folder, click the [Next] button. Normally, there is no need to change the folder in the installation directory. Change the installation directory if there is not enough free disk space available for the selected drive. To change the installation folder for ScanSnap, click the [Browse...] button. The "Select Directory" dialog box is displayed. Select the folder to install ScanSnap to. ⇒ The "Setup Type" screen is displayed. 7. Select an installation option and click [Next] button. Select [Typical] for ordinary use. ⇒ This displays the "Start Copying Files" screen. 14
-
 1
1 -
2
-
3
-
4
-
5
-
6
-
7
-
8
-
9
-
10
-
11
-
12
-
13
-
14
-
15
-
16
-
17
-
18
-
19
-
20
-
21
-
22
-
23
-
24
-
25
-
26
-
 27
27 -
 28
28 -
 29
29 -
 30
30 -
 31
31 -
 32
32 -
 33
33 -
 34
34 -
 35
35 -
 36
36 -
 37
37 -
38
-
39
-
40
-
41
-
42
-
43
-
44
-
45
-
46
-
47
-
48
-
49
-
50
-
51
-
52
-
53
-
54
-
55
-
56
-
57
-
58
-
59
-
60
-
61
-
62
-
63
-
64
-
65
-
66
-
67
-
68
-
69
-
70
-
71
-
72
-
73
-
74
-
75
-
76
-
77
-
78
-
79
-
80
-
81
-
82
-
83
-
84
-
85
-
86
-
87
-
88
-
89
-
90
-
91
-
92
-
93
-
94
-
95
-
96
-
97
-
98
-
99
-
100
-
101
-
102
-
103
-
104
-
105
-
106
-
107
-
108
-
109
-
110
-
111
-
112
-
113
-
114
-
115
-
116
-
117
-
118
-
119
-
120
-
121
-
122
-
123
-
124
-
125
-
126
-
127
-
128
-
129
-
130
-
131
-
132
-
133
-
134
-
135
-
136
-
137
-
138
-
139
-
140
-
141
-
142
-
143
-
144
-
145
-
146
-
147
-
148
-
149
-
150
-
151
-
152
-
153
-
154
-
155
-
156
-
157
-
158
-
159
-
160
-
161
-
162
-
163
-
164
-
165
-
166
-
167
-
168
-
169
-
170
-
171
-
172
-
173
-
174
-
175
-
176
-
177
-
178
-
179
-
180
-
181
 |
 |

14
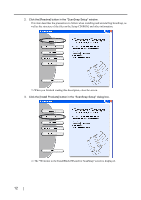
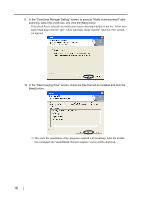
6.
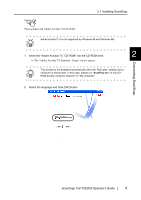
In the "Choose Destination Location" screen, choose the installation directory and
click the [Next] button.
To install ScanSnap in the displayed folder, click the [Next] button.
Normally, there is no need to change the folder in the installation directory. Change the
installation directory if there is not enough free disk space available for the selected drive.
To change the installation folder for ScanSnap, click the [Browse...] button. The "Select
Directory" dialog box is displayed. Select the folder to install ScanSnap to.
⇒
The "Setup Type" screen is displayed.
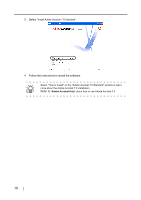
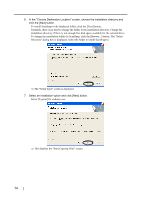
7.
Select an installation option and click [Next] button.
Select [Typical] for ordinary use.
⇒
This displays the "Start Copying Files" screen.