Fujitsu Fi-5110EOX2 Operating Guide - Page 37
Connecting the USB Cable, 2 Connecting ScanSnap to your PC, ScanSnap, fi-5110EOX2 Operator's Guide
 |
View all Fujitsu Fi-5110EOX2 manuals
Add to My Manuals
Save this manual to your list of manuals |
Page 37 highlights
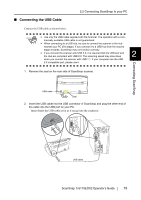
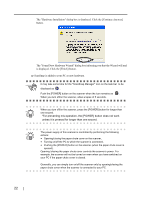
■ Connecting the USB Cable 2.2 Connecting ScanSnap to your PC Connect the USB cable as shown below. ATTENTION • Use only the USB cable supplied with the Scanner. The operation with a com- mercially available USB cable is not guaranteed. • When connecting to a USB hub, be sure to connect the scanner to the hub nearest your PC (first stage). If you connect it to a USB hub from the second stage onwards, ScanSnap may not function correctly. • If you connect the scanner with USB 2.0, it is required that the USB port and the Hub are compliant with USB 2.0. The scanning speed may slow down 2 when you connect the scanner with USB 1.1. If your computer has the USB 2.0 compatible port, please use it. 1. Remove the seal on the rear side of ScanSnap scanner. Connecting ScanSnap USB cable Seal 2. Insert the USB cable into the USB connector of ScanSnap and plug the other end of the cable into the USB port on your PC. Insert firmly the USB-cable as far as it can go into the connector. USB cable ScanSnap fi-5110EOX2 Operator's Guide 19
-
 1
1 -
2
-
3
-
4
-
5
-
6
-
7
-
8
-
9
-
10
-
11
-
12
-
13
-
14
-
15
-
16
-
17
-
18
-
19
-
20
-
21
-
22
-
23
-
24
-
25
-
26
-
27
-
28
-
29
-
30
-
31
-
 32
32 -
 33
33 -
 34
34 -
 35
35 -
 36
36 -
 37
37 -
 38
38 -
 39
39 -
 40
40 -
 41
41 -
 42
42 -
43
-
44
-
45
-
46
-
47
-
48
-
49
-
50
-
51
-
52
-
53
-
54
-
55
-
56
-
57
-
58
-
59
-
60
-
61
-
62
-
63
-
64
-
65
-
66
-
67
-
68
-
69
-
70
-
71
-
72
-
73
-
74
-
75
-
76
-
77
-
78
-
79
-
80
-
81
-
82
-
83
-
84
-
85
-
86
-
87
-
88
-
89
-
90
-
91
-
92
-
93
-
94
-
95
-
96
-
97
-
98
-
99
-
100
-
101
-
102
-
103
-
104
-
105
-
106
-
107
-
108
-
109
-
110
-
111
-
112
-
113
-
114
-
115
-
116
-
117
-
118
-
119
-
120
-
121
-
122
-
123
-
124
-
125
-
126
-
127
-
128
-
129
-
130
-
131
-
132
-
133
-
134
-
135
-
136
-
137
-
138
-
139
-
140
-
141
-
142
-
143
-
144
-
145
-
146
-
147
-
148
-
149
-
150
-
151
-
152
-
153
-
154
-
155
-
156
-
157
-
158
-
159
-
160
-
161
-
162
-
163
-
164
-
165
-
166
-
167
-
168
-
169
-
170
-
171
-
172
-
173
-
174
-
175
-
176
-
177
-
178
-
179
-
180
-
181
 |
 |
