Fujitsu Fi-5110EOX2 Operating Guide - Page 59
Press the [SCAN], button.
 |
View all Fujitsu Fi-5110EOX2 manuals
Add to My Manuals
Save this manual to your list of manuals |
Page 59 highlights
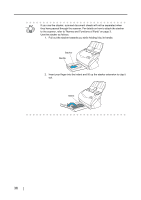
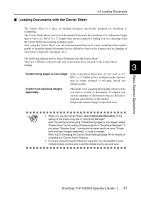
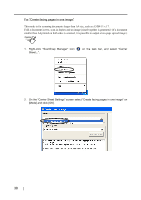
3.3 Loading Documents SCAN 9. Press the [SCAN] button. ⇒ The front and back image data are set in a facing-page state and generated side by side. ATTENTION Basic Scanner Operations There may be a gap in the joined portion, or a line may appear in the output image. Also, if you are scanning a thick document, the image has a tendency to 3 skew in such a way that the upper portions tilt towards each other at the joined area. In these situations, the skew is caused by how the document is folded, or the loading method. In this case, check the following. The situation may be improved. • Is the document neatly folded? • Is the edge of the document aligned closely to the edge of the Carrier Sheet? • Load the Carrier Sheet by turning the front side back. In the "Carrier Sheet Settings" window, when "Automatic Detection" in "Output image size" is selected, the generated image size may be smaller than the document. (The smallest size big enough to include all the data on the document is selected from among A3, B4 and 11 x 17) Example: If content printed as A4 size in the center of an A3 document is scanned, => it is generated in B4 size. To output an image that is the same size as the document size, set the document size in [Output image size]. ScanSnap fi-5110EOX2 Operator's Guide 41
-
 1
1 -
2
-
3
-
4
-
5
-
6
-
7
-
8
-
9
-
10
-
11
-
12
-
13
-
14
-
15
-
16
-
17
-
18
-
19
-
20
-
21
-
22
-
23
-
24
-
25
-
26
-
27
-
28
-
29
-
30
-
31
-
32
-
33
-
34
-
35
-
36
-
37
-
38
-
39
-
40
-
41
-
42
-
43
-
44
-
45
-
46
-
47
-
48
-
49
-
50
-
51
-
52
-
53
-
 54
54 -
 55
55 -
 56
56 -
 57
57 -
 58
58 -
 59
59 -
 60
60 -
 61
61 -
 62
62 -
 63
63 -
 64
64 -
65
-
66
-
67
-
68
-
69
-
70
-
71
-
72
-
73
-
74
-
75
-
76
-
77
-
78
-
79
-
80
-
81
-
82
-
83
-
84
-
85
-
86
-
87
-
88
-
89
-
90
-
91
-
92
-
93
-
94
-
95
-
96
-
97
-
98
-
99
-
100
-
101
-
102
-
103
-
104
-
105
-
106
-
107
-
108
-
109
-
110
-
111
-
112
-
113
-
114
-
115
-
116
-
117
-
118
-
119
-
120
-
121
-
122
-
123
-
124
-
125
-
126
-
127
-
128
-
129
-
130
-
131
-
132
-
133
-
134
-
135
-
136
-
137
-
138
-
139
-
140
-
141
-
142
-
143
-
144
-
145
-
146
-
147
-
148
-
149
-
150
-
151
-
152
-
153
-
154
-
155
-
156
-
157
-
158
-
159
-
160
-
161
-
162
-
163
-
164
-
165
-
166
-
167
-
168
-
169
-
170
-
171
-
172
-
173
-
174
-
175
-
176
-
177
-
178
-
179
-
180
-
181
 |
 |
