Garmin Forerunner 955 Solar Owners Manual - Page 16
Recording a Backcountry Skiing or Snowboarding Activity, Cross-Country Skiing Power Data
 |
View all Garmin Forerunner 955 Solar manuals
Add to My Manuals
Save this manual to your list of manuals |
Page 16 highlights
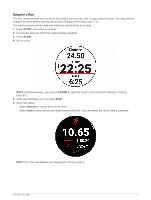
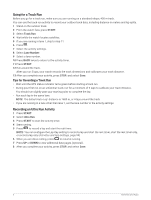
Recording a Backcountry Skiing or Snowboarding Activity The backcountry skiing or snowboarding activity lets you manually switch between climbing and descending tracking modes so you can accurately track your statistics. 1 Press START. 2 Select Backcountry Ski or Backcountry Snowboard. 3 Select an option: • If you are starting your activity on a climb, select Climbing. • If you are starting your activity moving downhill, select Descending. 4 Press START to start the activity timer. 5 Press to switch between climbing and descending tracking modes. 6 After you complete your activity, press STOP, and select Save. Cross-Country Skiing Power Data NOTE: The HRM-Pro™ series accessory must be paired to the Forerunner watch using ANT+® technology. You can use your compatible Forerunner watch paired with the HRM-Pro series accessory to provide real-time feedback about your cross-country skiing performance. The power output is measured in watts. Factors that affect power include your speed, elevation changes, wind, and snow conditions. You can use power output to measure and improve your skiing performance. NOTE: Skiing power values are generally lower than cycling power values. This is normal and occurs because humans are less efficient at skiing than they are at cycling. It is common for ski power values to be 30 to 40 percent lower than cycling power values at the same training intensity. Recording a Bouldering Activity You can record routes during a bouldering activity. A route is a climbing path along a boulder or small rock formation. 1 Press START. 2 Select Bouldering. 3 Select a grading system. NOTE: The next time you start a bouldering activity, the watch uses this grading system. You can hold , select the activity settings, and select Grading System to change the system. 4 Select the difficulty level for the route. 5 Press START to start the route timer. 6 Start your first route. 7 Press to finish the route. 8 Select an option: • To save a successful route, select Completed. • To save an unsuccessful route, select Attempted. • To delete the route, select Discard. 9 When you are done resting, press to start your next route. 10 Repeat this process for each route until your activity is complete. 11 After your last route, press STOP to stop the route timer. 12 Select Save. 8 Activities and Apps
-
 1
1 -
2
-
3
-
4
-
5
-
6
-
7
-
8
-
9
-
10
-
 11
11 -
 12
12 -
 13
13 -
 14
14 -
 15
15 -
 16
16 -
 17
17 -
 18
18 -
 19
19 -
 20
20 -
 21
21 -
22
-
23
-
24
-
25
-
26
-
27
-
28
-
29
-
30
-
31
-
32
-
33
-
34
-
35
-
36
-
37
-
38
-
39
-
40
-
41
-
42
-
43
-
44
-
45
-
46
-
47
-
48
-
49
-
50
-
51
-
52
-
53
-
54
-
55
-
56
-
57
-
58
-
59
-
60
-
61
-
62
-
63
-
64
-
65
-
66
-
67
-
68
-
69
-
70
-
71
-
72
-
73
-
74
-
75
-
76
-
77
-
78
-
79
-
80
-
81
-
82
-
83
-
84
-
85
-
86
-
87
-
88
-
89
-
90
-
91
-
92
-
93
-
94
-
95
-
96
-
97
-
98
-
99
-
100
-
101
-
102
-
103
-
104
-
105
-
106
-
107
-
108
-
109
-
110
-
111
-
112
-
113
-
114
-
115
-
116
-
117
-
118
-
119
-
120
-
121
-
122
-
123
-
124
-
125
-
126
-
127
-
128
-
129
-
130
-
131
-
132
-
133
-
134
-
135
-
136
-
137
-
138
-
139
-
140
-
141
-
142
-
143
-
144
-
145
-
146
 |
 |