Garmin Forerunner 955 Solar Owners Manual - Page 24
Moving the Flag, Viewing Measured Shots, Manually Measuring a Shot, Viewing Layup and Dogleg Distances
 |
View all Garmin Forerunner 955 Solar manuals
Add to My Manuals
Save this manual to your list of manuals |
Page 24 highlights
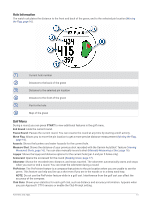
Moving the Flag You can take a closer look at the green and move the pin location. 1 From the hole information screen, press START. 2 Select Move Flag. 3 Press UP or DOWN to move the pin position. 4 Press START. The distances on the hole information screen are updated to show the new pin location. The pin location is saved for only the current round. Viewing Measured Shots Before the device can automatically detect and measure shots, you must enable scoring. Your device features automatic shot detection and recording. Each time you take a shot along the fairway, the device records your shot distance so you can view it later. TIP: Automatic shot detection works best when you wear the device on your leading wrist and make good contact with the ball. Putts are not detected. 1 While playing golf, select START > Measure Shot. Your last shot distance appears. NOTE: The distance automatically resets when you hit the ball again, putt on the green, or move to the next hole. 2 Select DOWN to view previously recorded shot distances. Manually Measuring a Shot You can manually add a shot if the watch doesn't detect it. You must add the shot from the location of the missed shot. 1 Take a shot and watch where your ball lands. 2 From the hole information screen, press START. 3 Select Measure Shot. 4 Press DOWN. 5 Select Add Shot > . 6 If necessary, enter the club you used for the shot. 7 Walk or drive to your ball. The next time you take a shot, the watch automatically records your last shot distance. If necessary, you can manually add another shot. Viewing Layup and Dogleg Distances You can view a list of layup and dogleg distances for par 4 and 5 holes. Custom targets also appear in this list. 1 From the hole information screen, press START. 2 Select Layups. Each layup and the distance until you reach each layup appear on the screen. NOTE: Distances are removed from the list as you pass them. Club Sensors Your watch is compatible with Approach CT10 golf club sensors. You can use paired club sensors to automatically track your golf shots, including location, distance, and club type. See the owner's manual for your club sensors for more information (garmin.com/manuals/ApproachCT10). 16 Activities and Apps
-
 1
1 -
2
-
3
-
4
-
5
-
6
-
7
-
8
-
9
-
10
-
11
-
12
-
13
-
14
-
15
-
16
-
17
-
18
-
 19
19 -
 20
20 -
 21
21 -
 22
22 -
 23
23 -
 24
24 -
 25
25 -
 26
26 -
 27
27 -
 28
28 -
 29
29 -
30
-
31
-
32
-
33
-
34
-
35
-
36
-
37
-
38
-
39
-
40
-
41
-
42
-
43
-
44
-
45
-
46
-
47
-
48
-
49
-
50
-
51
-
52
-
53
-
54
-
55
-
56
-
57
-
58
-
59
-
60
-
61
-
62
-
63
-
64
-
65
-
66
-
67
-
68
-
69
-
70
-
71
-
72
-
73
-
74
-
75
-
76
-
77
-
78
-
79
-
80
-
81
-
82
-
83
-
84
-
85
-
86
-
87
-
88
-
89
-
90
-
91
-
92
-
93
-
94
-
95
-
96
-
97
-
98
-
99
-
100
-
101
-
102
-
103
-
104
-
105
-
106
-
107
-
108
-
109
-
110
-
111
-
112
-
113
-
114
-
115
-
116
-
117
-
118
-
119
-
120
-
121
-
122
-
123
-
124
-
125
-
126
-
127
-
128
-
129
-
130
-
131
-
132
-
133
-
134
-
135
-
136
-
137
-
138
-
139
-
140
-
141
-
142
-
143
-
144
-
145
-
146
 |
 |