Gateway NV-53A Service Guide - Page 119
Replacing the LCD assembly lid, Tools you need to complete this task:, Screws removed during
 |
View all Gateway NV-53A manuals
Add to My Manuals
Save this manual to your list of manuals |
Page 119 highlights
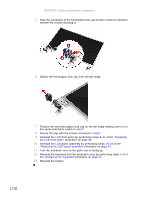
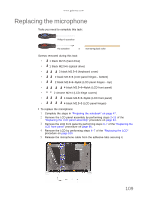
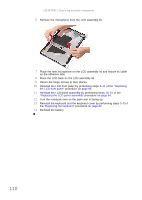
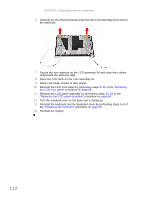
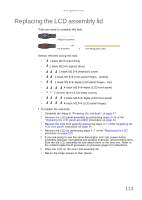
www.gateway.com Replacing the LCD assembly lid Tools you need to complete this task: Phillips #0 screwdriver Flat screwdriver or Non-marring plastic scribe Screws removed during this task: • 1 black M2×5 (hard drive) • 1 black M2.5×6 (optical drive) • 3 black M2.5×6 (keyboard cover) • 2 black M2.5×6 (LCD panel hinges - bottom) • 2 black M2.5×6+Nylok (LCD panel hinges - top) • 4 black M2.5×6+Nylok (LCD front panel) • 2 chrome M2×4 (LCD hinge covers) • 4 black M2.5×6+Nylok (LCD front panel) • 4 black M2.5×5 (LCD panel hinges) To replace the antennas: 1 Complete the steps in "Preparing the notebook" on page 47. 2 Remove the LCD panel assembly by performing steps 2-15 of the "Replacing the LCD panel assembly" procedure on page 64. 3 Remove the LCD front panel by performing steps 3-7 of the "Replacing the LCD front panel" procedure on page 95. 4 Remove the LCD by performing steps 4-7 of the "Replacing the LCD" procedure on page 100. 5 If you are going to use the same Kensington lock cap, power button assembly, webcam, microphone and wireless antennas, remove these items from the old LCD assembly lid and attach them to the new one. Refer to the related replacement procedure on previous pages for instructions. 6 Place the LCD on the new LCD assembly lid. 7 Return the hinge screws to their places. 113
-
 1
1 -
2
-
3
-
4
-
5
-
6
-
7
-
8
-
9
-
10
-
11
-
12
-
13
-
14
-
15
-
16
-
17
-
18
-
19
-
20
-
21
-
22
-
23
-
24
-
25
-
26
-
27
-
28
-
29
-
30
-
31
-
32
-
33
-
34
-
35
-
36
-
37
-
38
-
39
-
40
-
41
-
42
-
43
-
44
-
45
-
46
-
47
-
48
-
49
-
50
-
51
-
52
-
53
-
54
-
55
-
56
-
57
-
58
-
59
-
60
-
61
-
62
-
63
-
64
-
65
-
66
-
67
-
68
-
69
-
70
-
71
-
72
-
73
-
74
-
75
-
76
-
77
-
78
-
79
-
80
-
81
-
82
-
83
-
84
-
85
-
86
-
87
-
88
-
89
-
90
-
91
-
92
-
93
-
94
-
95
-
96
-
97
-
98
-
99
-
100
-
101
-
102
-
103
-
104
-
105
-
106
-
107
-
108
-
109
-
110
-
111
-
112
-
113
-
 114
114 -
 115
115 -
 116
116 -
 117
117 -
 118
118 -
 119
119 -
 120
120 -
 121
121 -
 122
122 -
 123
123 -
 124
124 -
125
-
126
-
127
-
128
-
129
-
130
-
131
-
132
-
133
-
134
-
135
-
136
-
137
-
138
-
139
-
140
-
141
-
142
-
143
-
144
-
145
-
146
-
147
-
148
-
149
-
150
-
151
-
152
-
153
-
154
-
155
-
156
-
157
-
158
-
159
-
160
-
161
-
162
-
163
-
164
-
165
-
166
-
167
-
168
 |
 |
