Gateway NV-53A Service Guide - Page 68
Replacing the keyboard, Tools you need to complete this task:, Screws removed during this task - replace touchpad
 |
View all Gateway NV-53A manuals
Add to My Manuals
Save this manual to your list of manuals |
Page 68 highlights
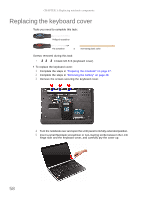
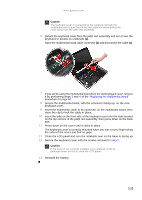
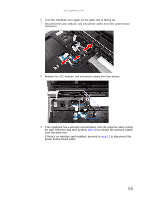
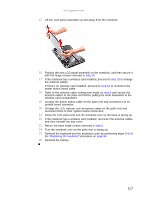
CHAPTER 3: Replacing notebook components Replacing the keyboard Tools you need to complete this task: Phillips #0 screwdriver Flat screwdriver or Non-marring plastic scribe Screws removed during this task: • 3 black M2.5×6 (keyboard cover) To replace the keyboard: 1 Complete the steps in "Preparing the notebook" on page 47. 2 Remove the keyboard cover by performing steps 2-6 of the "Replacing the keyboard cover" procedure on page 58. Caution The keyboard is connected to the notebook through the keyboard cable. Disconnect this cable first before pulling the keyboard away from the palm rest. 3 Lift the back edge of the keyboard slightly, then carefully slide it toward the LCD panel to release the keyboard retaining tabs from the palm rest. 4 Flip the keyboard over onto the touchpad area to access to the keyboard cable (a). Open the keyboard cable connector (b) and disconnect the cable (c). 62
-
 1
1 -
2
-
3
-
4
-
5
-
6
-
7
-
8
-
9
-
10
-
11
-
12
-
13
-
14
-
15
-
16
-
17
-
18
-
19
-
20
-
21
-
22
-
23
-
24
-
25
-
26
-
27
-
28
-
29
-
30
-
31
-
32
-
33
-
34
-
35
-
36
-
37
-
38
-
39
-
40
-
41
-
42
-
43
-
44
-
45
-
46
-
47
-
48
-
49
-
50
-
51
-
52
-
53
-
54
-
55
-
56
-
57
-
58
-
59
-
60
-
61
-
62
-
 63
63 -
 64
64 -
 65
65 -
 66
66 -
 67
67 -
 68
68 -
 69
69 -
 70
70 -
 71
71 -
 72
72 -
 73
73 -
74
-
75
-
76
-
77
-
78
-
79
-
80
-
81
-
82
-
83
-
84
-
85
-
86
-
87
-
88
-
89
-
90
-
91
-
92
-
93
-
94
-
95
-
96
-
97
-
98
-
99
-
100
-
101
-
102
-
103
-
104
-
105
-
106
-
107
-
108
-
109
-
110
-
111
-
112
-
113
-
114
-
115
-
116
-
117
-
118
-
119
-
120
-
121
-
122
-
123
-
124
-
125
-
126
-
127
-
128
-
129
-
130
-
131
-
132
-
133
-
134
-
135
-
136
-
137
-
138
-
139
-
140
-
141
-
142
-
143
-
144
-
145
-
146
-
147
-
148
-
149
-
150
-
151
-
152
-
153
-
154
-
155
-
156
-
157
-
158
-
159
-
160
-
161
-
162
-
163
-
164
-
165
-
166
-
167
-
168
 |
 |