Gateway NV-53A Service Guide - Page 65
on the top corners of the palm rest assembly, then press down on the back - keyboard cable clip
 |
View all Gateway NV-53A manuals
Add to My Manuals
Save this manual to your list of manuals |
Page 65 highlights
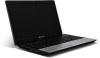
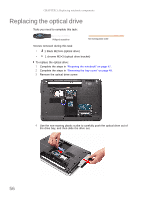
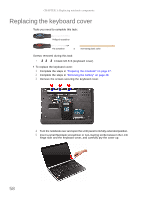
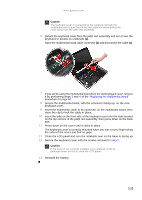
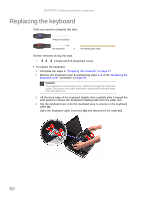
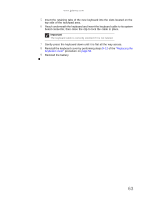
www.gateway.com Caution The keyboard cover is connected to the notebook through the multimedia board cable. Disconnect this cable first before pulling the cover away from the palm rest assembly. 6 Detach the keyboard cover from the palm rest assembly and turn it over the keyboard to access its underside (a). Open the multimedia board cable connector (b) and disconnect the cable (c). 7 If you will be using the multimedia board from the old keyboard cover, remove it by performing steps 3 and 4 of the "Replacing the multimedia board" procedure on page 60. 8 Secure the multimedia board, with the connector facing up, on the new keyboard cover. 9 Insert the multimedia cable to its connector on the multimedia board, then close the clip to lock the cable in place. 10 Insert the tabs on the front side of the keyboard cover into the slots located on the top corners of the palm rest assembly, then press down on the back part. 11 Press down on the cover until it clicks in place. The keyboard cover is correctly mounted when you can run you finger along the sides of the cover and find no gaps. 12 Close the LCD panel and turn the notebook over so the base is facing up. 13 Secure the keyboard cover with the screws removed in step 3. Caution If the cover is not correctly installed, your notebook could be damaged when you try to close the LCD panel. 14 Reinstall the battery. 59
-
 1
1 -
2
-
3
-
4
-
5
-
6
-
7
-
8
-
9
-
10
-
11
-
12
-
13
-
14
-
15
-
16
-
17
-
18
-
19
-
20
-
21
-
22
-
23
-
24
-
25
-
26
-
27
-
28
-
29
-
30
-
31
-
32
-
33
-
34
-
35
-
36
-
37
-
38
-
39
-
40
-
41
-
42
-
43
-
44
-
45
-
46
-
47
-
48
-
49
-
50
-
51
-
52
-
53
-
54
-
55
-
56
-
57
-
58
-
59
-
 60
60 -
 61
61 -
 62
62 -
 63
63 -
 64
64 -
 65
65 -
 66
66 -
 67
67 -
 68
68 -
 69
69 -
 70
70 -
71
-
72
-
73
-
74
-
75
-
76
-
77
-
78
-
79
-
80
-
81
-
82
-
83
-
84
-
85
-
86
-
87
-
88
-
89
-
90
-
91
-
92
-
93
-
94
-
95
-
96
-
97
-
98
-
99
-
100
-
101
-
102
-
103
-
104
-
105
-
106
-
107
-
108
-
109
-
110
-
111
-
112
-
113
-
114
-
115
-
116
-
117
-
118
-
119
-
120
-
121
-
122
-
123
-
124
-
125
-
126
-
127
-
128
-
129
-
130
-
131
-
132
-
133
-
134
-
135
-
136
-
137
-
138
-
139
-
140
-
141
-
142
-
143
-
144
-
145
-
146
-
147
-
148
-
149
-
150
-
151
-
152
-
153
-
154
-
155
-
156
-
157
-
158
-
159
-
160
-
161
-
162
-
163
-
164
-
165
-
166
-
167
-
168
 |
 |