HP 2100 HP LaserJet 2100 Series Printer -User Guide - Page 167
Checking Memory Installation, incorrectly installed. See Troubleshooting Error Messages
 |
UPC - 873662008284
View all HP 2100 manuals
Add to My Manuals
Save this manual to your list of manuals |
Page 167 highlights
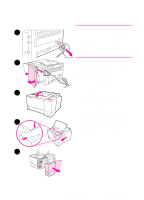
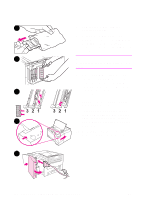
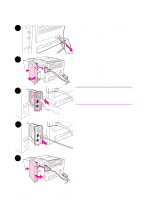
Checking Memory Installation Note To verify that DIMMs are installed correctly: 1. Turn the printer on. Check that the printer control panel displays the Ready light after the printer has gone through the startup sequence. If an error message appears, a DIMM may have been incorrectly installed. See "Troubleshooting Error Messages" on page 99. 2. Print a configuration page by pressing the Go and Job Cancel buttons simultaneously. 3. Check the memory section on the configuration page and compare it with the configuration page printed before the DIMM installation. If the amount of recognized memory has not increased: The DIMM may not be installed correctly (repeat the installation procedure). Try another DIMM Slot. The DIMM may be defective (try a new DIMM). If you installed a printer language (personality), check the Installed Personalities and Options section on the configuration page. This area should list the new printer language. EN Appendix C Printer Memory and Expansion 155
-
 1
1 -
2
-
3
-
4
-
5
-
6
-
7
-
8
-
9
-
10
-
11
-
12
-
13
-
14
-
15
-
16
-
17
-
18
-
19
-
20
-
21
-
22
-
23
-
24
-
25
-
26
-
27
-
28
-
29
-
30
-
31
-
32
-
33
-
34
-
35
-
36
-
37
-
38
-
39
-
40
-
41
-
42
-
43
-
44
-
45
-
46
-
47
-
48
-
49
-
50
-
51
-
52
-
53
-
54
-
55
-
56
-
57
-
58
-
59
-
60
-
61
-
62
-
63
-
64
-
65
-
66
-
67
-
68
-
69
-
70
-
71
-
72
-
73
-
74
-
75
-
76
-
77
-
78
-
79
-
80
-
81
-
82
-
83
-
84
-
85
-
86
-
87
-
88
-
89
-
90
-
91
-
92
-
93
-
94
-
95
-
96
-
97
-
98
-
99
-
100
-
101
-
102
-
103
-
104
-
105
-
106
-
107
-
108
-
109
-
110
-
111
-
112
-
113
-
114
-
115
-
116
-
117
-
118
-
119
-
120
-
121
-
122
-
123
-
124
-
125
-
126
-
127
-
128
-
129
-
130
-
131
-
132
-
133
-
134
-
135
-
136
-
137
-
138
-
139
-
140
-
141
-
142
-
143
-
144
-
145
-
146
-
147
-
148
-
149
-
150
-
151
-
152
-
153
-
154
-
155
-
156
-
157
-
158
-
159
-
160
-
161
-
 162
162 -
 163
163 -
 164
164 -
 165
165 -
 166
166 -
 167
167 -
 168
168 -
 169
169 -
 170
170 -
 171
171 -
 172
172 -
173
-
174
-
175
-
176
-
177
-
178
-
179
-
180
-
181
-
182
-
183
-
184
 |
 |