HP 9200C HP 9200c Digital Sender - Support Guide - Page 34
Access Public Folders, Response Type - default password
 |
UPC - 829160458878
View all HP 9200C manuals
Add to My Manuals
Save this manual to your list of manuals |
Page 34 highlights
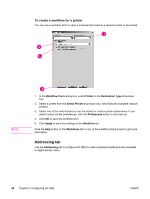
NOTE NOTE Follow these instructions to add prompts. a. Click the Add button to add prompts. b. In the Add Prompts dialog box, click the New button to create a new prompt. This opens the Workflow Prompt dialog box. c. Under Prompt Settings in the Workflow Prompt dialog box, type the Prompt Name, the Prompt Text, and any Help Text for the prompt. The Help text appears if the user touches the HELP button on the digital-sender control panel while the prompt is on the screen. d. Under Response Settings, select the Response Format. The Response Format options are String, Numeric, Date, Time, or Privacy. The Privacy response format uses asterisks (*) to hide what the user types in on the control panel. This response type can be used for private information such as a password or an employee number. e. Under Response Type, select User Editable or Selection List. If User Editable is selected, you can select the User must supply a response check box to require a response. f. If applicable, type a default response in the Default Response text box. The program uses the default response if the user does not provide a response to the prompt. g. Click OK to save the prompt settings. The new prompt is added to the Prompts List in the Add Prompts dialog box. h. Repeat steps b through g as needed to create more prompts. i. After creating all of the required prompts, you can use the Move buttons at the bottom of the list to adjust the order of the prompts. j. Click OK to accept the new set of prompts. The new prompts appear in the Prompts area of the Workflow Form dialog box. 11. Click OK to accept all of the settings on the Workflow Form dialog box. The new form appears in the workflows list on the Workflows tab. A workflow form can be edited at any time by selecting it and then clicking the Properties button. 12. Type the public access credentials for access to workflow folders in the Credentials to Access Public Folders area of the Workflow tab. This information is required before you can save the workflow settings. 13. Click Apply to save the new workflow settings. 26 Chapter 2 Configuring HP DSS ENWW
-
 1
1 -
2
-
3
-
4
-
5
-
6
-
7
-
8
-
9
-
10
-
11
-
12
-
13
-
14
-
15
-
16
-
17
-
18
-
19
-
20
-
21
-
22
-
23
-
24
-
25
-
26
-
27
-
28
-
 29
29 -
 30
30 -
 31
31 -
 32
32 -
 33
33 -
 34
34 -
 35
35 -
 36
36 -
 37
37 -
 38
38 -
 39
39 -
40
-
41
-
42
-
43
-
44
-
45
-
46
-
47
-
48
-
49
-
50
-
51
-
52
-
53
-
54
-
55
-
56
-
57
-
58
-
59
-
60
-
61
-
62
-
63
-
64
-
65
-
66
-
67
-
68
-
69
-
70
-
71
-
72
-
73
-
74
-
75
-
76
-
77
-
78
-
79
-
80
-
81
-
82
-
83
-
84
-
85
-
86
-
87
-
88
-
89
-
90
-
91
-
92
-
93
-
94
-
95
-
96
-
97
-
98
-
99
-
100
-
101
-
102
-
103
-
104
-
105
-
106
-
107
-
108
-
109
-
110
-
111
-
112
-
113
-
114
-
115
-
116
-
117
-
118
-
119
-
120
-
121
-
122
-
123
-
124
 |
 |
