HP 9200C HP 9200c Digital Sender - Support Guide - Page 76
Calibrating the scanner, Touchscreen test, To print the calibration target - digital sender document scanner
 |
UPC - 829160458878
View all HP 9200C manuals
Add to My Manuals
Save this manual to your list of manuals |
Page 76 highlights
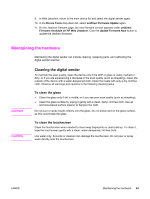
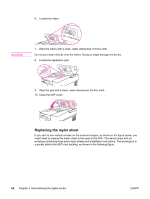
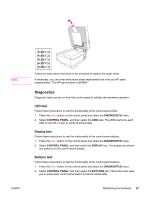
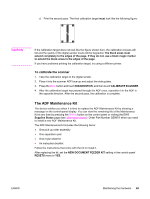
Touchscreen test Follow these instructions to test the functionality of the control-panel touchscreen. 1. Press the MENU button on the control panel and touch the DIAGNOSTICS menu. 2. Touch CONTROL PANEL, and then touch TOUCHSCREEN. The touchscreen test divides the screen into a grid and then asks you to touch each section of the grid to test its functionality. Calibrating the scanner The purpose of the scanner calibration process is to compensate for offsets in the scanner imaging system (carriage head) for ADF and flatbed scans. Because of mechanical tolerances, the scanner carriage head might not read the position of the image accurately. During the calibration procedure, scanner offset values are calculated and stored. The offset values are subsequently used when producing scans so that the correct portion of the scanned image is obtained by either adding or subtracting the number of pixels that are indicated in the offset from the lines or rows of the image. Scanner calibration should only be carried out if you notice offset problems with the scanned images. The scanner is calibrated before it leaves the factory and normally should not need to be calibrated again. Before calibrating the scanner, you must print the calibration target on a printer. To print the calibration target 1. Go to the http://www.hp.com/go/9200c_scanner_cal Web page and follow the instructions to download the calibration target. The calibration target file is also available on the documentation CD-ROM that came with the device. The file name is CALIBRATION.PDF. 2. Print the target on any HP LaserJet printer or another available, laser-quality printer. a. Place letter or A4 paper in tray 1 (or the multipurpose tray) and adjust the side guides. b. Print the first pass of the calibration target. c. Return the first pass of the calibration target to tray 1 so that the arrows are facing into the printer. 68 Chapter 3 Administering the digital sender ENWW
-
 1
1 -
2
-
3
-
4
-
5
-
6
-
7
-
8
-
9
-
10
-
11
-
12
-
13
-
14
-
15
-
16
-
17
-
18
-
19
-
20
-
21
-
22
-
23
-
24
-
25
-
26
-
27
-
28
-
29
-
30
-
31
-
32
-
33
-
34
-
35
-
36
-
37
-
38
-
39
-
40
-
41
-
42
-
43
-
44
-
45
-
46
-
47
-
48
-
49
-
50
-
51
-
52
-
53
-
54
-
55
-
56
-
57
-
58
-
59
-
60
-
61
-
62
-
63
-
64
-
65
-
66
-
67
-
68
-
69
-
70
-
 71
71 -
 72
72 -
 73
73 -
 74
74 -
 75
75 -
 76
76 -
 77
77 -
 78
78 -
 79
79 -
 80
80 -
 81
81 -
82
-
83
-
84
-
85
-
86
-
87
-
88
-
89
-
90
-
91
-
92
-
93
-
94
-
95
-
96
-
97
-
98
-
99
-
100
-
101
-
102
-
103
-
104
-
105
-
106
-
107
-
108
-
109
-
110
-
111
-
112
-
113
-
114
-
115
-
116
-
117
-
118
-
119
-
120
-
121
-
122
-
123
-
124
 |
 |
