HP ENVY 6400e User Guide - Page 11
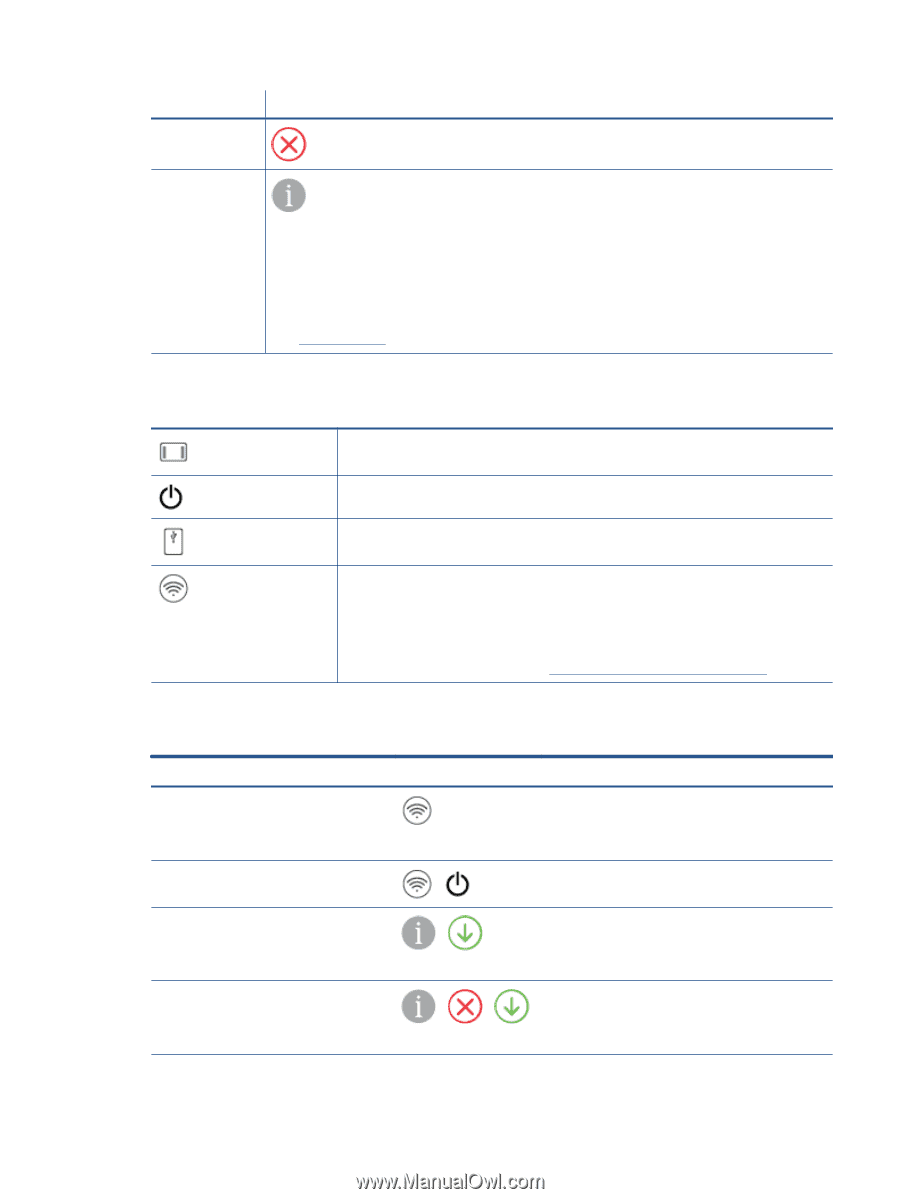
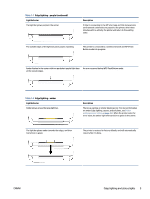
Buttons on the back of the printer, Button combinations, Description, Function, Instruction - wps pin
 |
View all HP ENVY 6400e manuals
Add to My Manuals
Save this manual to your list of manuals |
Page 11 highlights
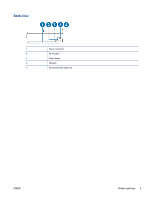
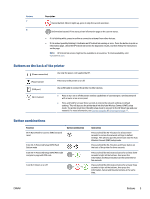
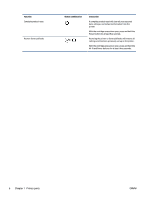
Feature 7 8 Description (Cancel button): When it lights up, press to stop the current operation. (Information button): Prints out a printer information page on the current status. ● If it is blinking white, press to confirm a connection attempt from other devices. ● If it is amber (possibly blinking), it indicates an HP Instant Ink warning or error. Press the button to print an information page, check the HP Instant Ink section for diagnostic results, and then follow the instructions on the page. NOTE: HP Instant Ink service might not be available in all countries. To check availability, visit hpinstantink.com. Buttons on the back of the printer (Power connection) Use only the power cord supplied by HP. (Power button) (USB port) (Wi-Fi button) Press to turn the printer on or off. Use a USB cable to connect the printer to other devices. ● Press to turn on or off the printer wireless capabilities of connecting to a wireless network with a router or an access point. ● Press and hold for at least three seconds to restore the network settings to default settings. This will also put the printer back into the Auto Wireless Connect (AWC) setup mode. The printer must be in the AWC setup mode to connect to the HP Smart app and your network. For more information, see Connect using the HP Smart app on page 27. Button combinations Function Wi-Fi Auto Wireless Connect (AWC) network reset Button combination Enter Wi-Fi Protected Setup (WPS) Push Button mode + Enter Wi-Fi Protected Setup (WPS) PIN mode and print a page with PIN code + Turn Wi-Fi Direct on or off + + Instruction Press and hold the Wi-Fi button for at least three seconds to restore the network settings to default settings. This will also put the printer back into the Auto Wireless Connect (AWC) setup mode. Press and hold the Wi-Fi button and Power button on the back of the printer for three seconds. Press and hold the Information button for at least three seconds to light all the buttons, then press the Information and Resume buttons at the same time for five seconds. Press and hold the Information button for at least three seconds to light all the buttons, then press the Information, Cancel and Resume buttons at the same time. ENWW Buttons 5
-
 1
1 -
2
-
3
-
4
-
5
-
 6
6 -
 7
7 -
 8
8 -
 9
9 -
 10
10 -
 11
11 -
 12
12 -
 13
13 -
 14
14 -
 15
15 -
 16
16 -
17
-
18
-
19
-
20
-
21
-
22
-
23
-
24
-
25
-
26
-
27
-
28
-
29
-
30
-
31
-
32
-
33
-
34
-
35
-
36
-
37
-
38
-
39
-
40
-
41
-
42
-
43
-
44
-
45
-
46
-
47
-
48
-
49
-
50
-
51
-
52
-
53
-
54
-
55
-
56
-
57
-
58
-
59
-
60
-
61
-
62
-
63
-
64
-
65
-
66
-
67
-
68
-
69
-
70
-
71
-
72
-
73
-
74
-
75
-
76
-
77
-
78
-
79
-
80
-
81
-
82
-
83
-
84
-
85
-
86
-
87
-
88
-
89
-
90
-
91
-
92
-
93
-
94
-
95
-
96
-
97
-
98
-
99
-
100
-
101
-
102
-
103
-
104
-
105
-
106
-
107
-
108
-
109
-
110
-
111
-
112
-
113
-
114
-
115
-
116
-
117
-
118
-
119
-
120
-
121
-
122
-
123
-
124
-
125
-
126
-
127
-
128
-
129
-
130
-
131
-
132
-
133
-
134
-
135
-
136
-
137
-
138
-
139
-
140
-
141
-
142
 |
 |