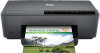
HP OfficeJet Pro 6230 User Guide - Page 22
The Paper Size Selection button and lights
 |
View all HP OfficeJet Pro 6230 manuals
Add to My Manuals
Save this manual to your list of manuals |
Page 22 highlights
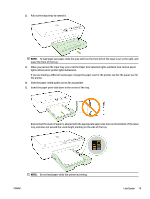
Table 2-6 HP wireless direct button (continued) Light description/Light pattern Explanation and recommended action The HP wireless direct capability of the printer is turned on. If you press the ( HP wireless direct ) button and the ( Information ) button together, the printer prints the HP Wireless Direct Guide. The guide provides step-by-step instructions to use HP wireless direct. It includes the HP wireless direct network name and password along with instructions on how to connect mobile devices, how to print the page again, and how to customize the HP wireless direct settings. The Paper Size Selection button and lights ● The following table provides information on the button's different light patterns. Table 2-7 Paper Size Selection button and lights Light description/Light pattern Explanation and recommended action One of the Paper Size Selection lights is on. The Paper Size Selection light that is on indicates the paper size currently set for the printer. If you have loaded a different paper size, set the paper size in the printer to match (see Set the paper size for the printer) For better printing experience, be sure to load paper that matches the paper settings of the printer. One of the Paper Size Selection lights is blinking. This occurs when you pull out the input tray. The Paper Size Selection light that is blinking indicates the paper size currently set for the printer. - If you have loaded a different standard paper size, choose the appropriate paper size by pressing the button until the light matches the loaded paper size. - Once you are done checking paper or loading the correct paper, close the tray properly. The light will stop blinking and become solid. If you have loaded a different paper size, set the paper size in the printer to match (see Set the paper size for the printer). - If you press the button once when the light is blinking, blinking will also stop and the light will become solid. 14 Chapter 2 Get started ENWW
-
 1
1 -
2
-
3
-
4
-
5
-
6
-
7
-
8
-
9
-
10
-
11
-
12
-
13
-
14
-
15
-
16
-
 17
17 -
 18
18 -
 19
19 -
 20
20 -
 21
21 -
 22
22 -
 23
23 -
 24
24 -
 25
25 -
 26
26 -
 27
27 -
28
-
29
-
30
-
31
-
32
-
33
-
34
-
35
-
36
-
37
-
38
-
39
-
40
-
41
-
42
-
43
-
44
-
45
-
46
-
47
-
48
-
49
-
50
-
51
-
52
-
53
-
54
-
55
-
56
-
57
-
58
-
59
-
60
-
61
-
62
-
63
-
64
-
65
-
66
-
67
-
68
-
69
-
70
-
71
-
72
-
73
-
74
-
75
-
76
-
77
-
78
-
79
-
80
-
81
-
82
-
83
-
84
-
85
-
86
-
87
-
88
-
89
-
90
-
91
-
92
-
93
-
94
-
95
-
96
-
97
-
98
-
99
-
100
-
101
-
102
-
103
-
104
 |
 |
