HP Vectra VL 5/xxx HP Vectra VL 5/xxX Series 3 PC - User’s Guide - Page 29
C:\masters\viddrv\diskwin, C:\masters\viddrv\diskdos
 |
View all HP Vectra VL 5/xxx manuals
Add to My Manuals
Save this manual to your list of manuals |
Page 29 highlights
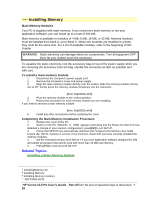
# $ K + Installing a Video Memory Module Your PC is supplied with 1 MB of video memory. If you need to have more video memory to display more colors, higher resolutions, or for increased speed, you can install up to 2 MB inside your PC. The PC has one socket for a 1 MB video memory module (order D3404A). Some of the available video resolutions: Resolution : Video memory required for these colors: 16 colors 256 colors 64 K colors hi-color 16.7 M colors true-color 640 x 480 800 x 600 1024 x 768 1280 x 1024 1 MB 1 MB 1 MB 1 MB 2 MB 1 MB 1 MB 2 MB 2 MB Not Available Not Available To Install a Video Memory Module 1. Disconnect the power supply cord. 2. Remove the computer's cover and power supply. 3. Align the video memory module directly over the socket. Slide the memory module into the slot at 45°. Firmly press the memory module completely into the connector. {bmc help0026.bmp} If you need to remove the video memory module: {bmc help0027.wmf} 4. Install any other accessories before replacing the cover. Completing the Video Memory Installation Procedure 1. Replace the cover of the PC. 2. Switch on the PC. 3. Check that the Power-On-Self-Test has automatically detected and configured theVideo RAM Size field. 4. When Windows has loaded, click on the Hputils group icon to display the Hewlett-Packard utilities. 5. Click on the HP User Tools icon to display the HP User Tools utility. 6. Click on the Video Mode icon and follow the screen messages to change the video resolution and the number of colors displayed. NOTE If you need to use a special video driver for your application, you may be asked to insert a diskette containg the driver in drive A. In this case, insert the video drivers diskette you created with the Master Disk Creation utility. Alternatively, type C:\MASTERS\VIDDRV\DISKWIN (for Windows applications) or type C:\MASTERS\VIDDRV\DISKDOS (for DOS applications) and press [ENTER]. # InstallingaVideoMemoryModule.26 $ Installing a Video Memory Module K Installing a Video Memory Module;video memory modules;installing;memory;checking + SECTION3:0035 HP Vectra VL5 PC User's Guide - Part 2Error! No text of specified style in document. • 29
-
 1
1 -
2
-
3
-
4
-
5
-
6
-
7
-
8
-
9
-
10
-
11
-
12
-
13
-
14
-
15
-
16
-
17
-
18
-
19
-
20
-
21
-
22
-
23
-
 24
24 -
 25
25 -
 26
26 -
 27
27 -
 28
28 -
 29
29 -
 30
30 -
 31
31 -
 32
32 -
 33
33 -
 34
34 -
35
-
36
-
37
-
38
-
39
-
40
-
41
-
42
-
43
-
44
-
45
-
46
-
47
-
48
-
49
-
50
-
51
-
52
-
53
-
54
-
55
-
56
-
57
-
58
-
59
-
60
-
61
-
62
-
63
-
64
-
65
-
66
-
67
-
68
-
69
-
70
-
71
-
72
-
73
-
74
-
75
-
76
-
77
-
78
-
79
-
80
-
81
-
82
-
83
-
84
-
85
-
86
-
87
-
88
-
89
-
90
-
91
-
92
-
93
-
94
-
95
-
96
-
97
-
98
-
99
-
100
-
101
-
102
-
103
-
104
-
105
-
106
-
107
-
108
-
109
-
110
-
111
-
112
 |
 |
