HP Vectra VL 5/xxx HP Vectra VL 5/xxX Series 3 PC - User’s Guide - Page 39
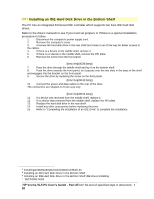
Completing the Installation of an IDE Drive
 |
View all HP Vectra VL 5/xxx manuals
Add to My Manuals
Save this manual to your list of manuals |
Page 39 highlights
# $ K + Completing the Installation of an IDE Drive After installing an IDE drive you will need to run the SETUP program to confirm that the drive has been detected by the PC. When an Additional IDE Drive is Installed 1. Replace the cover of the PC. 2. Turn on the PC. 3. When appears, press [F2] to run the SETUP program. 4. In the Hard Disk Drives section, check that the details for Drive 2 have been correctly detected by the SETUP program. 5. Press [F3] to save and exit SETUP. Refer to the operating system documentation for information on formatting a drive and installing the operating system. When the Bootable IDE Drive is Replaced 1. Replace the cover of the PC. 2. Turn on the PC. 3. An error message will appear during the Power-On-Self-Test.When prompted, press [F2] to run the SETUP program. 4. In the Hard Disk Drives section, check that the details for Drive 1 have been correctly detected by the SETUP program. 5. Press [F3] to save and exit SETUP. Refer to the operating system documentation for information on formatting a drive and installing the operating system. NOTE If an IDE drive is removed, an error message will appear during the Power-OnSelf-Test. You must run the SETUP program and select None or SCSI for the missing drive to correct the error. # CompletingtheInstallationofanIDEDrive.36 $ Completing the Installation of an IDE Drive K Completing the Installation of an IDE Drive + SECTION3:0085 HP Vectra VL5 PC User's Guide - Part 2Error! No text of specified style in document. • 39
-
 1
1 -
2
-
3
-
4
-
5
-
6
-
7
-
8
-
9
-
10
-
11
-
12
-
13
-
14
-
15
-
16
-
17
-
18
-
19
-
20
-
21
-
22
-
23
-
24
-
25
-
26
-
27
-
28
-
29
-
30
-
31
-
32
-
33
-
 34
34 -
 35
35 -
 36
36 -
 37
37 -
 38
38 -
 39
39 -
 40
40 -
 41
41 -
 42
42 -
 43
43 -
 44
44 -
45
-
46
-
47
-
48
-
49
-
50
-
51
-
52
-
53
-
54
-
55
-
56
-
57
-
58
-
59
-
60
-
61
-
62
-
63
-
64
-
65
-
66
-
67
-
68
-
69
-
70
-
71
-
72
-
73
-
74
-
75
-
76
-
77
-
78
-
79
-
80
-
81
-
82
-
83
-
84
-
85
-
86
-
87
-
88
-
89
-
90
-
91
-
92
-
93
-
94
-
95
-
96
-
97
-
98
-
99
-
100
-
101
-
102
-
103
-
104
-
105
-
106
-
107
-
108
-
109
-
110
-
111
-
112
 |
 |
