HP Vectra VL 5/xxx HP Vectra VL 5/xxX Series 3 PC - User’s Guide - Page 37
Installing an IDE Hard Disk Drive in the Rear Shelf
 |
View all HP Vectra VL 5/xxx manuals
Add to My Manuals
Save this manual to your list of manuals |
Page 37 highlights
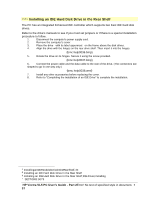
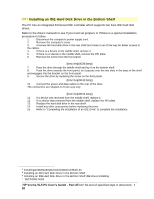
# $ K + Installing an IDE Hard Disk Drive in the Rear Shelf The PC has an integrated Enhanced IDE controller which supports two Fast IDE hard disk drives. Refer to the drive's manuals to see if you must set jumpers or if there is a special installation procedure to follow. 1. Disconnect the computer's power supply cord. 2. Remove the computer's cover. 3. Place the drivewith its label uppermoston the frame above the disk drives. 4. Align the drive with the hinges on the rear drive shelf. Then insert it into the hinges. {bmc help0036.bmp} 5. Rotate the drive on its hinges. Secure it using the screw provided. {bmc help0037.bmp} 6. Connect the power cable and the data cable to the rear of the drive. (The connectors are shaped to go in one way only.) {bmc help0038.wmf} 7. Install any other accessories before replacing the cover. 8. Refer to "Completing the Installation of an IDE Drive" to complete the installation. # InstallinganIDEHardDiskDriveintheRearShelf.34 $ Installing an IDE Hard Disk Drive in the Rear Shelf K Installing an IDE Hard Disk Drive in the Rear Shelf;IDE drives;installing + SECTION3:0075 HP Vectra VL5 PC User's Guide - Part 2Error! No text of specified style in document. • 37
-
 1
1 -
2
-
3
-
4
-
5
-
6
-
7
-
8
-
9
-
10
-
11
-
12
-
13
-
14
-
15
-
16
-
17
-
18
-
19
-
20
-
21
-
22
-
23
-
24
-
25
-
26
-
27
-
28
-
29
-
30
-
31
-
 32
32 -
 33
33 -
 34
34 -
 35
35 -
 36
36 -
 37
37 -
 38
38 -
 39
39 -
 40
40 -
 41
41 -
 42
42 -
43
-
44
-
45
-
46
-
47
-
48
-
49
-
50
-
51
-
52
-
53
-
54
-
55
-
56
-
57
-
58
-
59
-
60
-
61
-
62
-
63
-
64
-
65
-
66
-
67
-
68
-
69
-
70
-
71
-
72
-
73
-
74
-
75
-
76
-
77
-
78
-
79
-
80
-
81
-
82
-
83
-
84
-
85
-
86
-
87
-
88
-
89
-
90
-
91
-
92
-
93
-
94
-
95
-
96
-
97
-
98
-
99
-
100
-
101
-
102
-
103
-
104
-
105
-
106
-
107
-
108
-
109
-
110
-
111
-
112
 |
 |