HP Vectra VL 5/xxx HP Vectra VL 5/xxX Series 3 PC - User’s Guide - Page 41
Installing an Upgrade Processor
 |
View all HP Vectra VL 5/xxx manuals
Add to My Manuals
Save this manual to your list of manuals |
Page 41 highlights
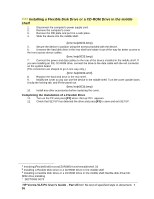
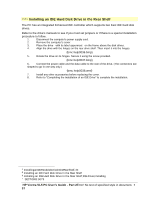
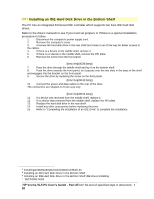
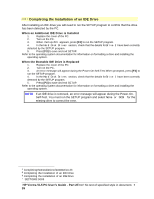
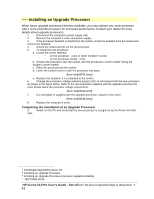
# $ K + Installing an Upgrade Processor When future upgrade processors become available, you may replace your main processor with a more powerful processor for increased performance. Contact your dealer for more details about upgrade processors. 1. Disconnect the computer's power supply cord. 2. Remove the computer's cover and power supply. 3. If the processor heatsink is attached to the socket, unclip the heatsink from the socket and remove the heatsink. 4. Unlock the socket and lift out the old processor. 5. To install the new processor: a. Locate the corner markers: ∗ on the processora dot or notch ("broken" corner) ∗ on the processor socketa dot. b. Position the processor over the socket, with the processor's corner marker facing the socket's corner marker. c. Place the processor into the socket. d. Lower the socket's lever to lock the processor into place. {bmc help0042.bmp} e. Replace the heatsink, if it is attached to the socket. 6. Change the processor voltage selection jumper (J27) to correspond with the new processor, as shown in the figure below. Refer to the documentation supplied with the upgrade processor for more details about the processor voltage requirement. {bmc help0043.wmf} 7. If a nameplate is supplied with the upgrade processor, install it in the cover. {bmc help0044.bmp} 8. Replace the computer's cover. Completing the Installation of an Upgrade Processor 9. Switch on the PC and verify that the new processor is recognized by the Power-On-Self- Test. # InstallinganUpgradeProcessor.38 $ Installing an Upgrade Processor K Installing an Upgrade Processor;processor upgrade;installing + SECTION3:0095 HP Vectra VL5 PC User's Guide - Part 2Error! No text of specified style in document. • 41
-
 1
1 -
2
-
3
-
4
-
5
-
6
-
7
-
8
-
9
-
10
-
11
-
12
-
13
-
14
-
15
-
16
-
17
-
18
-
19
-
20
-
21
-
22
-
23
-
24
-
25
-
26
-
27
-
28
-
29
-
30
-
31
-
32
-
33
-
34
-
35
-
 36
36 -
 37
37 -
 38
38 -
 39
39 -
 40
40 -
 41
41 -
 42
42 -
 43
43 -
 44
44 -
 45
45 -
 46
46 -
47
-
48
-
49
-
50
-
51
-
52
-
53
-
54
-
55
-
56
-
57
-
58
-
59
-
60
-
61
-
62
-
63
-
64
-
65
-
66
-
67
-
68
-
69
-
70
-
71
-
72
-
73
-
74
-
75
-
76
-
77
-
78
-
79
-
80
-
81
-
82
-
83
-
84
-
85
-
86
-
87
-
88
-
89
-
90
-
91
-
92
-
93
-
94
-
95
-
96
-
97
-
98
-
99
-
100
-
101
-
102
-
103
-
104
-
105
-
106
-
107
-
108
-
109
-
110
-
111
-
112
 |
 |