HP d640 HP D640 High-Volume Printer - Installation Manual (Printer and Accesso - Page 101
Step 3 - Setting Alignment Values, Calculate The New Values
 |
View all HP d640 manuals
Add to My Manuals
Save this manual to your list of manuals |
Page 101 highlights
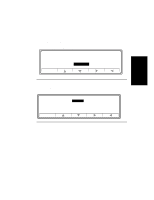
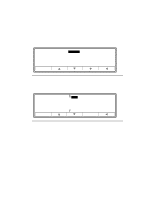
Procedure 15: Paper Path Alignment Step 3 - Setting Alignment Values You will now calculate and enter the new alignment values into the Control Panel. Calculate The New Values 1. For each adjustment value, add the two numbers and write the next value, as shown in Figure 2-101. -6 +6 +3 +15 -2 +14 -2 -2 0 No adjustment necessary +1 +7 +7 Figure 2-101 Adjustment Values Entered Into Worksheet 2. Once you calculate the new value, enter it in the Control Panel as follows: 2-92 Installation
-
 1
1 -
2
-
3
-
4
-
5
-
6
-
7
-
8
-
9
-
10
-
11
-
12
-
13
-
14
-
15
-
16
-
17
-
18
-
19
-
20
-
21
-
22
-
23
-
24
-
25
-
26
-
27
-
28
-
29
-
30
-
31
-
32
-
33
-
34
-
35
-
36
-
37
-
38
-
39
-
40
-
41
-
42
-
43
-
44
-
45
-
46
-
47
-
48
-
49
-
50
-
51
-
52
-
53
-
54
-
55
-
56
-
57
-
58
-
59
-
60
-
61
-
62
-
63
-
64
-
65
-
66
-
67
-
68
-
69
-
70
-
71
-
72
-
73
-
74
-
75
-
76
-
77
-
78
-
79
-
80
-
81
-
82
-
83
-
84
-
85
-
86
-
87
-
88
-
89
-
90
-
91
-
92
-
93
-
94
-
95
-
 96
96 -
 97
97 -
 98
98 -
 99
99 -
 100
100 -
 101
101 -
 102
102 -
 103
103 -
 104
104 -
 105
105 -
 106
106 -
107
-
108
-
109
-
110
-
111
-
112
-
113
-
114
-
115
-
116
-
117
-
118
-
119
-
120
-
121
-
122
-
123
-
124
-
125
-
126
-
127
-
128
-
129
-
130
-
131
-
132
-
133
-
134
-
135
-
136
-
137
-
138
-
139
-
140
-
141
-
142
-
143
-
144
-
145
-
146
-
147
-
148
-
149
-
150
-
151
-
152
-
153
-
154
-
155
-
156
-
157
-
158
-
159
-
160
-
161
-
162
-
163
-
164
-
165
-
166
-
167
-
168
-
169
-
170
-
171
-
172
-
173
-
174
-
175
-
176
-
177
-
178
-
179
-
180
-
181
-
182
-
183
-
184
-
185
-
186
-
187
-
188
-
189
-
190
-
191
-
192
-
193
-
194
-
195
-
196
-
197
-
198
-
199
-
200
-
201
-
202
-
203
-
204
-
205
-
206
-
207
-
208
-
209
-
210
 |
 |

Procedure 15: Paper Path Alignment
2-92
Installation
Step 3 - Setting Alignment Values
You will now calculate and enter the new alignment values into the Control Panel.
Calculate The New Values
1.
For each adjustment value, add the two numbers and write the next value, as shown in
Figure 2-101.
Figure 2-101
Adjustment Values Entered Into Worksheet
2.
Once you calculate the new value, enter it in the Control Panel as follows:
-6
+3
-2
-2
0
No adjustment necessary
+1
-2
+7
+7
+14
+6
+15