HP d640 HP D640 High-Volume Printer - Installation Manual (Printer and Accesso - Page 77
Configuring the Printer, Online
 |
View all HP d640 manuals
Add to My Manuals
Save this manual to your list of manuals |
Page 77 highlights
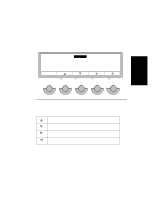
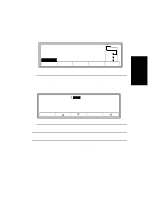
Procedure 10: Setting the Paper Trays Control Panel Display The right hand side of the Control Panel display shows a diagram of the printer. The display includes installed paper trays and associated paper sizes as shown in Figure 2-70. Printer diagram Ready - - free JUN 18 05:32.23 PCL Ofnfliinnee Offline Custom Menu 600dpi LTR LTR LTR Test PapSize Figure 2-70 Control Panel Display, Main Screen • LTR indicates letter size paper and that the paper tray has paper. • LTR indicates letter size paper and that the paper tray is empty. The display also shows the selected paper path, from the selected tray, out to the selected paper output. Configuring the Printer 1. Press the PapSize button on the Main Screen (see Figure 2-70) to display the PapSize menu shown in Figure 2-71. PapSize tray1size tray2size tray3size =LETTER =LETTER =LETTER Online Online Figure 2-71 PapSize Menu The PapSize submenu provides access to paper size selections for each tray. 2-68 Installation
-
 1
1 -
2
-
3
-
4
-
5
-
6
-
7
-
8
-
9
-
10
-
11
-
12
-
13
-
14
-
15
-
16
-
17
-
18
-
19
-
20
-
21
-
22
-
23
-
24
-
25
-
26
-
27
-
28
-
29
-
30
-
31
-
32
-
33
-
34
-
35
-
36
-
37
-
38
-
39
-
40
-
41
-
42
-
43
-
44
-
45
-
46
-
47
-
48
-
49
-
50
-
51
-
52
-
53
-
54
-
55
-
56
-
57
-
58
-
59
-
60
-
61
-
62
-
63
-
64
-
65
-
66
-
67
-
68
-
69
-
70
-
71
-
 72
72 -
 73
73 -
 74
74 -
 75
75 -
 76
76 -
 77
77 -
 78
78 -
 79
79 -
 80
80 -
 81
81 -
 82
82 -
83
-
84
-
85
-
86
-
87
-
88
-
89
-
90
-
91
-
92
-
93
-
94
-
95
-
96
-
97
-
98
-
99
-
100
-
101
-
102
-
103
-
104
-
105
-
106
-
107
-
108
-
109
-
110
-
111
-
112
-
113
-
114
-
115
-
116
-
117
-
118
-
119
-
120
-
121
-
122
-
123
-
124
-
125
-
126
-
127
-
128
-
129
-
130
-
131
-
132
-
133
-
134
-
135
-
136
-
137
-
138
-
139
-
140
-
141
-
142
-
143
-
144
-
145
-
146
-
147
-
148
-
149
-
150
-
151
-
152
-
153
-
154
-
155
-
156
-
157
-
158
-
159
-
160
-
161
-
162
-
163
-
164
-
165
-
166
-
167
-
168
-
169
-
170
-
171
-
172
-
173
-
174
-
175
-
176
-
177
-
178
-
179
-
180
-
181
-
182
-
183
-
184
-
185
-
186
-
187
-
188
-
189
-
190
-
191
-
192
-
193
-
194
-
195
-
196
-
197
-
198
-
199
-
200
-
201
-
202
-
203
-
204
-
205
-
206
-
207
-
208
-
209
-
210
 |
 |
