HP d640 HP D640 High-Volume Printer - Installation Manual (Printer and Accesso - Page 88
Procedure 13: Printing a Setup Report, Online, Select, MAINT, FONTS, TABLE, TYPES, MENUS
 |
View all HP d640 manuals
Add to My Manuals
Save this manual to your list of manuals |
Page 88 highlights
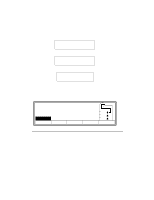
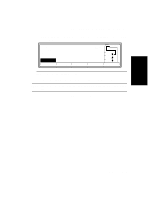
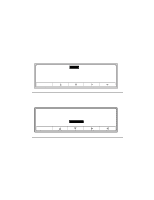
Installation Procedure 13: Printing a Setup Report Procedure 13: Printing a Setup Report You are now ready to print a setup report. A successful printout indicates that all printer components are installed and are operating correctly. Keep in mind, however, that the printer to computer connection is not yet in place. 1. Press the Test button on the Main Screen, shown below in Figure 2-87. Ready - - free JUN 18 05:32.23 PCL Ofnfliinnee Offline Custom Menu 600dpi LTR LTR LTR Test PapSize Figure 2-87 Main Screen 2. Select SETUPS from the Test submenu, as shown in Figure 2-88, and press the Select button. Online Test SETUPS MAINT FONTS TABLE TYPES MENUS Select Figure 2-88 Test Submenu Figure 2-89, Sample Setup Report, Page 1, on page 2-80, shows the information reported when you print the SETUPS submenu. 3. Check the printer setup report print. It should look similar to the sample setup report in Figure 2-89. If it does, proceed to Procedure 14: Securing the Printer. Installation 2-79
-
 1
1 -
2
-
3
-
4
-
5
-
6
-
7
-
8
-
9
-
10
-
11
-
12
-
13
-
14
-
15
-
16
-
17
-
18
-
19
-
20
-
21
-
22
-
23
-
24
-
25
-
26
-
27
-
28
-
29
-
30
-
31
-
32
-
33
-
34
-
35
-
36
-
37
-
38
-
39
-
40
-
41
-
42
-
43
-
44
-
45
-
46
-
47
-
48
-
49
-
50
-
51
-
52
-
53
-
54
-
55
-
56
-
57
-
58
-
59
-
60
-
61
-
62
-
63
-
64
-
65
-
66
-
67
-
68
-
69
-
70
-
71
-
72
-
73
-
74
-
75
-
76
-
77
-
78
-
79
-
80
-
81
-
82
-
 83
83 -
 84
84 -
 85
85 -
 86
86 -
 87
87 -
 88
88 -
 89
89 -
 90
90 -
 91
91 -
 92
92 -
 93
93 -
94
-
95
-
96
-
97
-
98
-
99
-
100
-
101
-
102
-
103
-
104
-
105
-
106
-
107
-
108
-
109
-
110
-
111
-
112
-
113
-
114
-
115
-
116
-
117
-
118
-
119
-
120
-
121
-
122
-
123
-
124
-
125
-
126
-
127
-
128
-
129
-
130
-
131
-
132
-
133
-
134
-
135
-
136
-
137
-
138
-
139
-
140
-
141
-
142
-
143
-
144
-
145
-
146
-
147
-
148
-
149
-
150
-
151
-
152
-
153
-
154
-
155
-
156
-
157
-
158
-
159
-
160
-
161
-
162
-
163
-
164
-
165
-
166
-
167
-
168
-
169
-
170
-
171
-
172
-
173
-
174
-
175
-
176
-
177
-
178
-
179
-
180
-
181
-
182
-
183
-
184
-
185
-
186
-
187
-
188
-
189
-
190
-
191
-
192
-
193
-
194
-
195
-
196
-
197
-
198
-
199
-
200
-
201
-
202
-
203
-
204
-
205
-
206
-
207
-
208
-
209
-
210
 |
 |
