HP d640 HP D640 High-Volume Printer - Installation Manual (Printer and Accesso - Page 122
HP 3000 MPE/iX RS-232C through a DTC16 or DTC48
 |
View all HP d640 manuals
Add to My Manuals
Save this manual to your list of manuals |
Page 122 highlights
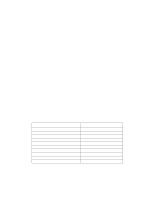
Procedure 2: Configure the Printer on Your Host System HP 3000 MPE/iX RS-232C through a DTC16 or DTC48 The DTC16 and DTC48 support baud rates up to 19200 baud. The printer has a DB25 connector. For printer type 22, and connecting to a modem card, use cable 40242Y or equivalent, pins 1, 2, 3, 7 (2, 3 crossed). RS-232C. In Figure 3- Procedure 3: Setting the Printer's Communication Interface, on page 3-21, use the Control Panel to set up the serial interface parameters: Table 3-5 Baud rate Stop Bits Parity Flow Control DTR Levels D640 Serial Settings 19200 or 38400 1BIT none ROBUST XON/XOFF HI/HI RS232 HP 3000 MPE/iX RS-232C Through a DTC16xx or DTC72MX The DTC16xx and DTC72MX support baud rates up to 38400 for direct connect devices. RS-232C maximum cable length is 15 meters, though you might be able to exceed that when using DTC16xx or DTC72MX under favorable conditions. See the DTC Cabling and Racking Guide (C5961-0373) for further details. The printer has a DB25 connector for RS-232C operation. For printer type 22, and connecting to 8-port DDP, use cable 40242Y; pins 1, 2, 3, 7 (2, 3 crossed). RS-232C. In Figure 3- Procedure 3: Setting the Printer's Communication Interface, on page 3-21, use the Control Panel to set up the serial interface parameters shown in Table 5 on page 20. 3-20 Host Computer Interface Installation and Configuration
-
 1
1 -
2
-
3
-
4
-
5
-
6
-
7
-
8
-
9
-
10
-
11
-
12
-
13
-
14
-
15
-
16
-
17
-
18
-
19
-
20
-
21
-
22
-
23
-
24
-
25
-
26
-
27
-
28
-
29
-
30
-
31
-
32
-
33
-
34
-
35
-
36
-
37
-
38
-
39
-
40
-
41
-
42
-
43
-
44
-
45
-
46
-
47
-
48
-
49
-
50
-
51
-
52
-
53
-
54
-
55
-
56
-
57
-
58
-
59
-
60
-
61
-
62
-
63
-
64
-
65
-
66
-
67
-
68
-
69
-
70
-
71
-
72
-
73
-
74
-
75
-
76
-
77
-
78
-
79
-
80
-
81
-
82
-
83
-
84
-
85
-
86
-
87
-
88
-
89
-
90
-
91
-
92
-
93
-
94
-
95
-
96
-
97
-
98
-
99
-
100
-
101
-
102
-
103
-
104
-
105
-
106
-
107
-
108
-
109
-
110
-
111
-
112
-
113
-
114
-
115
-
116
-
 117
117 -
 118
118 -
 119
119 -
 120
120 -
 121
121 -
 122
122 -
 123
123 -
 124
124 -
 125
125 -
 126
126 -
 127
127 -
128
-
129
-
130
-
131
-
132
-
133
-
134
-
135
-
136
-
137
-
138
-
139
-
140
-
141
-
142
-
143
-
144
-
145
-
146
-
147
-
148
-
149
-
150
-
151
-
152
-
153
-
154
-
155
-
156
-
157
-
158
-
159
-
160
-
161
-
162
-
163
-
164
-
165
-
166
-
167
-
168
-
169
-
170
-
171
-
172
-
173
-
174
-
175
-
176
-
177
-
178
-
179
-
180
-
181
-
182
-
183
-
184
-
185
-
186
-
187
-
188
-
189
-
190
-
191
-
192
-
193
-
194
-
195
-
196
-
197
-
198
-
199
-
200
-
201
-
202
-
203
-
204
-
205
-
206
-
207
-
208
-
209
-
210
 |
 |
