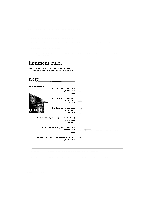
HP d640 HP D640 High-Volume Printer - Installation Manual (Printer and Accesso - Page 103
Tray alignment, Maintenance.alignment Tray 1 Setting, Tray1 Values
 |
View all HP d640 manuals
Add to My Manuals
Save this manual to your list of manuals |
Page 103 highlights
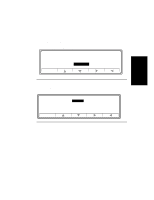
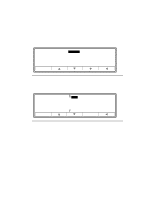
Procedure 15: Paper Path Alignment Tray alignment 1. Use the down arrow to highlight tray1, then press the right arrow. This is the Maintenance.alignment screen, shown in Figure 2-104. Maintenance.alignment tray1 = 5 tray2 = 6 tray3 = 5 duplex = -6 duplexv = -7 Online Online Figure 2-104 Maintenance.alignment Tray 1 Setting 2. Press either the up or down arrow to highlight the Tray 1 new value calculated on the Simplex feed alignment ruler sheet.. The selection range is from -25 to +25, (except for duplex). See Figure 2-105. Maintenance.alignment.tray1 = 5 6 7 8 9 Online 10 Online Select Figure 2-105 Tray1 Values 3. Press Select to save the new value and to return to the Maintenance.alignment submenu. 4. Repeat steps 1 through 4 for trays 2, 3, HCI, duplex, and duplexv. 5. Verify your alignment by repeating the procedure in "Step 1 - Printing Alignment Sheets" on page -84. If the alignment is still off (plus or minus 3 to 4 increments), note the adjustment values as you did in the previous alignment procedure, and set the new adjustment values in the Control Panel. 6. This procedure may need to be repeated periodically to ensure proper alignment. If you only print on blank paper, alignment is not so critical for your work. Congratulations! You have now completed installation of the D640 printer. Now proceed on to Chapter 3 to configure the printer with your host computer. 2-94 Installation
-
 1
1 -
2
-
3
-
4
-
5
-
6
-
7
-
8
-
9
-
10
-
11
-
12
-
13
-
14
-
15
-
16
-
17
-
18
-
19
-
20
-
21
-
22
-
23
-
24
-
25
-
26
-
27
-
28
-
29
-
30
-
31
-
32
-
33
-
34
-
35
-
36
-
37
-
38
-
39
-
40
-
41
-
42
-
43
-
44
-
45
-
46
-
47
-
48
-
49
-
50
-
51
-
52
-
53
-
54
-
55
-
56
-
57
-
58
-
59
-
60
-
61
-
62
-
63
-
64
-
65
-
66
-
67
-
68
-
69
-
70
-
71
-
72
-
73
-
74
-
75
-
76
-
77
-
78
-
79
-
80
-
81
-
82
-
83
-
84
-
85
-
86
-
87
-
88
-
89
-
90
-
91
-
92
-
93
-
94
-
95
-
96
-
97
-
 98
98 -
 99
99 -
 100
100 -
 101
101 -
 102
102 -
 103
103 -
 104
104 -
 105
105 -
 106
106 -
 107
107 -
 108
108 -
109
-
110
-
111
-
112
-
113
-
114
-
115
-
116
-
117
-
118
-
119
-
120
-
121
-
122
-
123
-
124
-
125
-
126
-
127
-
128
-
129
-
130
-
131
-
132
-
133
-
134
-
135
-
136
-
137
-
138
-
139
-
140
-
141
-
142
-
143
-
144
-
145
-
146
-
147
-
148
-
149
-
150
-
151
-
152
-
153
-
154
-
155
-
156
-
157
-
158
-
159
-
160
-
161
-
162
-
163
-
164
-
165
-
166
-
167
-
168
-
169
-
170
-
171
-
172
-
173
-
174
-
175
-
176
-
177
-
178
-
179
-
180
-
181
-
182
-
183
-
184
-
185
-
186
-
187
-
188
-
189
-
190
-
191
-
192
-
193
-
194
-
195
-
196
-
197
-
198
-
199
-
200
-
201
-
202
-
203
-
204
-
205
-
206
-
207
-
208
-
209
-
210
 |
 |
