HP d640 HP D640 High-Volume Printer - Installation Manual (Printer and Accesso - Page 116
HP 9000 HP-UX Network Printer - TCP/IP, Jet Direct EX idle timeout
 |
View all HP d640 manuals
Add to My Manuals
Save this manual to your list of manuals |
Page 116 highlights
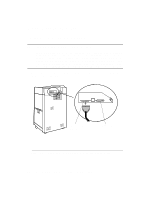
Procedure 2: Configure the Printer on Your Host System 11. Activate OK 12. Answer whatever additional questions SAM has for you. 13. Exit SAM In "Procedure 3: Setting the Printer's Communication Interface" on page 3-21, use the control panel to set the Interface Parameters, as shown in Table 3-5, "D640 Serial Settings," on page 3-20. HP 9000 HP-UX Network Printer - TCP/IP The HP JetDirect EX Interface is very flexible - you can even limit access to the printer to certain host addresses. You can read more about the capabilities of the HP JetDirect EX interface in the JetDirect EX Software Installation Guide (J2593-90011). Information to gather: • The name for the printer (lp spooler name) • The class to which the printer will be added (optional) • The print request priority for this printer • Will this be the system default printer? (the default queue) • The network node name for the JetDirect EX interface • The IP address for the JetDirect EX interface Configure the JetDirect EX IP address into the host system. If the JetDirect EX already has a server associated with it, and you do not need to change any of the items in the list below, skip this section: • IP Address • Network printer name • Printer location • Printer contact person • Subnet mask • IP Address of the nearest gateway • Jet Direct EX idle timeout • List of host systems allowed access to the JetDirect EX 1. Connect the JetDirect EX to the printer; or, if you are using a JetDirect EX Plus 3, connect the printer to printer 1. 2. Press the button on the JetDirect EX. This makes a hardcopy of the interface status information so you know the link level address (LAN HW ADDRESS) of the JetDirect EX interface. Save this 2-page printout for reference. 3-14 Host Computer Interface Installation and Configuration
-
 1
1 -
2
-
3
-
4
-
5
-
6
-
7
-
8
-
9
-
10
-
11
-
12
-
13
-
14
-
15
-
16
-
17
-
18
-
19
-
20
-
21
-
22
-
23
-
24
-
25
-
26
-
27
-
28
-
29
-
30
-
31
-
32
-
33
-
34
-
35
-
36
-
37
-
38
-
39
-
40
-
41
-
42
-
43
-
44
-
45
-
46
-
47
-
48
-
49
-
50
-
51
-
52
-
53
-
54
-
55
-
56
-
57
-
58
-
59
-
60
-
61
-
62
-
63
-
64
-
65
-
66
-
67
-
68
-
69
-
70
-
71
-
72
-
73
-
74
-
75
-
76
-
77
-
78
-
79
-
80
-
81
-
82
-
83
-
84
-
85
-
86
-
87
-
88
-
89
-
90
-
91
-
92
-
93
-
94
-
95
-
96
-
97
-
98
-
99
-
100
-
101
-
102
-
103
-
104
-
105
-
106
-
107
-
108
-
109
-
110
-
 111
111 -
 112
112 -
 113
113 -
 114
114 -
 115
115 -
 116
116 -
 117
117 -
 118
118 -
 119
119 -
 120
120 -
 121
121 -
122
-
123
-
124
-
125
-
126
-
127
-
128
-
129
-
130
-
131
-
132
-
133
-
134
-
135
-
136
-
137
-
138
-
139
-
140
-
141
-
142
-
143
-
144
-
145
-
146
-
147
-
148
-
149
-
150
-
151
-
152
-
153
-
154
-
155
-
156
-
157
-
158
-
159
-
160
-
161
-
162
-
163
-
164
-
165
-
166
-
167
-
168
-
169
-
170
-
171
-
172
-
173
-
174
-
175
-
176
-
177
-
178
-
179
-
180
-
181
-
182
-
183
-
184
-
185
-
186
-
187
-
188
-
189
-
190
-
191
-
192
-
193
-
194
-
195
-
196
-
197
-
198
-
199
-
200
-
201
-
202
-
203
-
204
-
205
-
206
-
207
-
208
-
209
-
210
 |
 |
