Kyocera TASKalfa 620 620/820 Operation Guide (Advanced) - Page 114
Selecting Collating and Offsetting Output, Selecting Auto Image Rotation, Copy Default
 |
View all Kyocera TASKalfa 620 manuals
Add to My Manuals
Save this manual to your list of manuals |
Page 114 highlights
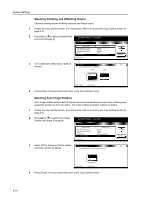
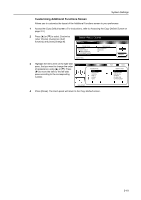
System Settings Selecting Collating and Offsetting Output Chooses collating and/or offsetting output as the default output. 1 Access the Copy Default screen. (For instructions, refer to Accessing the Copy Default Screen on page 3-3.) 2 Press [S] or [T] to select Collate/Offset and press [Change #]. System Menu / Counter Copy Default Default menu Adj. Manual dens.(Mixed) Adj. Manual dens.(Text) Adj. Manual dens.(Photo) Zoom Co l l ate/ O ffse t System Menu Setting mode Standard Standard Standard 100% Collate: On/Offset: Off Change # 3 Turn Collate and Offset [On] or [Off] as Co l l ate/O ffse t Back desired. Select default mode for Collat/eOffset. Co l l ate O ffse t Off Off On On System Menu - Copy Default 4 Press [Close]. The touch panel will return to the Copy Default screen. Selecting Auto Image Rotation Auto Iimage rotation delivers sets of copied documents perpendicular to each other, allowing easy separation of each set from the others. This mode enables automatic rotation by default. 1 Access the Copy Default screen. (For instructions, refer to Accessing the Copy Default Screen on page 3-3.) 2 Press [S] or [T] to select Auto Image Rotation and press [Change #]. System Menu / Counter Copy Default Default menu Adj. Manual dens.(Text) Adj. Manual dens.(Photo) Zoom Co l l ate/ O ffse t Auto Image Rotation System Menu Setting mode Standard Standard 100% Collate: On/Offset: Off Rotate Change # 3 Select [Off] to disable or [On] to enable Auto Image Rotation Back automatic rotation by default. Select default mode for Auto Rotatio,nON or OFF. Off On System Menu - Copy Default 4 Press [Close]. The touch panel will return to the Copy Default screen. 3-14
-
 1
1 -
2
-
3
-
4
-
5
-
6
-
7
-
8
-
9
-
10
-
11
-
12
-
13
-
14
-
15
-
16
-
17
-
18
-
19
-
20
-
21
-
22
-
23
-
24
-
25
-
26
-
27
-
28
-
29
-
30
-
31
-
32
-
33
-
34
-
35
-
36
-
37
-
38
-
39
-
40
-
41
-
42
-
43
-
44
-
45
-
46
-
47
-
48
-
49
-
50
-
51
-
52
-
53
-
54
-
55
-
56
-
57
-
58
-
59
-
60
-
61
-
62
-
63
-
64
-
65
-
66
-
67
-
68
-
69
-
70
-
71
-
72
-
73
-
74
-
75
-
76
-
77
-
78
-
79
-
80
-
81
-
82
-
83
-
84
-
85
-
86
-
87
-
88
-
89
-
90
-
91
-
92
-
93
-
94
-
95
-
96
-
97
-
98
-
99
-
100
-
101
-
102
-
103
-
104
-
105
-
106
-
107
-
108
-
 109
109 -
 110
110 -
 111
111 -
 112
112 -
 113
113 -
 114
114 -
 115
115 -
 116
116 -
 117
117 -
 118
118 -
 119
119 -
120
-
121
-
122
-
123
-
124
-
125
-
126
-
127
-
128
-
129
-
130
-
131
-
132
-
133
-
134
-
135
-
136
-
137
-
138
-
139
-
140
-
141
-
142
-
143
-
144
-
145
-
146
-
147
-
148
-
149
-
150
-
151
-
152
-
153
-
154
-
155
-
156
-
157
-
158
-
159
-
160
-
161
-
162
-
163
-
164
-
165
-
166
-
167
-
168
-
169
-
170
-
171
-
172
-
173
-
174
-
175
-
176
-
177
-
178
-
179
-
180
-
181
-
182
-
183
-
184
-
185
-
186
-
187
-
188
-
189
-
190
-
191
-
192
-
193
-
194
-
195
-
196
-
197
-
198
-
199
-
200
-
201
-
202
-
203
-
204
-
205
-
206
-
207
-
208
-
209
-
210
-
211
-
212
 |
 |
