Kyocera TASKalfa 620 620/820 Operation Guide (Advanced) - Page 45
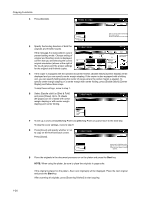
Press [Layout A] or [Layout B]., Press [Memo s].
 |
View all Kyocera TASKalfa 620 manuals
Add to My Manuals
Save this manual to your list of manuals |
Page 45 highlights
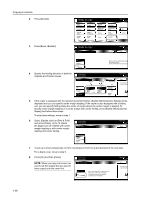
2 Press [Memo Pages]. 3 Press [Layout A] or [Layout B]. Copying Functions Ready to copy. Auto Image Ro tati o n E co P ri n t Re p e at Copy OHP Backi n g O ri g i n al O ri e n t. Output Tray Proof Copy Ne g ati ve Image S tap l e /Punch Me m o P ag e s Mi rro r Im ag e Mu l ti- p ag e Fo rm Paper Size 11x8 100% Up D o wn Basi c User choice Fu n cti o n Program Ready to copy. Memo Pages Shortcut Paper Size 11x8 100% Back Off Layout A Layout B Reduce original to create area for taking notes. 4 Select the layout. Ready to copy. Memo Pages Layo u t Off LMaaynouuatlA Layout B Shortcut Border line None Solid D o tte d P o si ti o n Mark Paper Size 11x8 50% Back Select Original O ri e n tati o n. Top Edge Top 5 Select the page boundary line. 6 Place the originals in the document processor or on the platen and press the Start key. If the original is placed on the platen, Scan next original(s) will be displayed. Place the next original and press the Start key. After scanning all originals, press [Scanning finished] to start copying. 1-39
-
 1
1 -
2
-
3
-
4
-
5
-
6
-
7
-
8
-
9
-
10
-
11
-
12
-
13
-
14
-
15
-
16
-
17
-
18
-
19
-
20
-
21
-
22
-
23
-
24
-
25
-
26
-
27
-
28
-
29
-
30
-
31
-
32
-
33
-
34
-
35
-
36
-
37
-
38
-
39
-
 40
40 -
 41
41 -
 42
42 -
 43
43 -
 44
44 -
 45
45 -
 46
46 -
 47
47 -
 48
48 -
 49
49 -
 50
50 -
51
-
52
-
53
-
54
-
55
-
56
-
57
-
58
-
59
-
60
-
61
-
62
-
63
-
64
-
65
-
66
-
67
-
68
-
69
-
70
-
71
-
72
-
73
-
74
-
75
-
76
-
77
-
78
-
79
-
80
-
81
-
82
-
83
-
84
-
85
-
86
-
87
-
88
-
89
-
90
-
91
-
92
-
93
-
94
-
95
-
96
-
97
-
98
-
99
-
100
-
101
-
102
-
103
-
104
-
105
-
106
-
107
-
108
-
109
-
110
-
111
-
112
-
113
-
114
-
115
-
116
-
117
-
118
-
119
-
120
-
121
-
122
-
123
-
124
-
125
-
126
-
127
-
128
-
129
-
130
-
131
-
132
-
133
-
134
-
135
-
136
-
137
-
138
-
139
-
140
-
141
-
142
-
143
-
144
-
145
-
146
-
147
-
148
-
149
-
150
-
151
-
152
-
153
-
154
-
155
-
156
-
157
-
158
-
159
-
160
-
161
-
162
-
163
-
164
-
165
-
166
-
167
-
168
-
169
-
170
-
171
-
172
-
173
-
174
-
175
-
176
-
177
-
178
-
179
-
180
-
181
-
182
-
183
-
184
-
185
-
186
-
187
-
188
-
189
-
190
-
191
-
192
-
193
-
194
-
195
-
196
-
197
-
198
-
199
-
200
-
201
-
202
-
203
-
204
-
205
-
206
-
207
-
208
-
209
-
210
-
211
-
212
 |
 |
