Kyocera TASKalfa 620 620/820 Operation Guide (Advanced) - Page 35
IMPORTANT, Start, Setting, Description, Specifying Cassette for Cover Paper, Scan next originals
 |
View all Kyocera TASKalfa 620 manuals
Add to My Manuals
Save this manual to your list of manuals |
Page 35 highlights
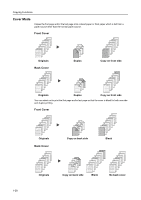
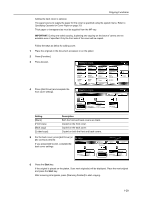
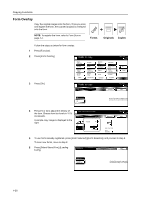
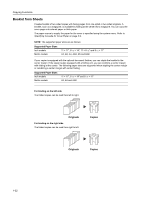
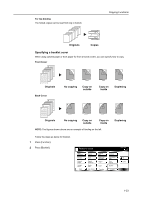
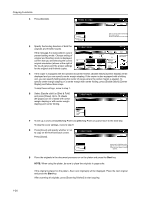
Copying Functions Adding the back cover is optional. The paper source to supply the paper for the cover is specified using the system menu. Refer to Specifying Cassette for Cover Paper on page 3-9. Thick paper or transparencies must be supplied from the MP tray. IMPORTANT: During one-sided copying, duplexing and copying on the back of covers are not available even if specified. Only the front side of the cover will be copied. Follow the steps as below for adding cover. 1 Place the originals in the document processor or on the platen. 2 Press [Function]. 3 Press [Cover]. Ready to copy. P ap e r S e l e cti o n D e n si ty O ri g i n al Im ag e Co l l ate/ O ffse t Basi c Duplex Zoom Marg i n / Ce n te ri n g Bo rd e r Erase User choice O ri g i n al Size Mixed Size O ri g i n al s Page # Co ve r Fu n cti o n Combine Co n ti n u o u s Scan Fo rm O ve rl ay Bo o kl e t Program 4 Press [Add Cover] and complete the front cover settings. Ready to copy. Co ve r Front cover Shortcut Paper Size 11x8 100% Up D o wn Paper Size 11x8 100% Back No cover Add Cover Bl an k Front copy Back copy 2 sided co p y No cover Add Cover Setting [Blank] [Front copy] [Back copy] [2 sided copy] Description Both the front and back covers are blank. Copied on the front cover. Copied on the back cover. Copied on both the front and back covers. 5 For the back cover, press [Add Cover] or to copy. [No cover] as desired. If you press [Add Cover], complete the back cover settings. Bl an k Front copy Back copy 2 sided co p y Shortcut Rear cover Paper Size Set 11x8½" 100% Back Close No cover Add Cover Bl an k Front copy Back copy 2 sided copy 6 Press the Start key. If the original is placed on the platen, Scan next original(s) will be displayed. Place the next original and press the Start key. After scanning all originals, press [Scanning finished] to start copying. 1-29
-
 1
1 -
2
-
3
-
4
-
5
-
6
-
7
-
8
-
9
-
10
-
11
-
12
-
13
-
14
-
15
-
16
-
17
-
18
-
19
-
20
-
21
-
22
-
23
-
24
-
25
-
26
-
27
-
28
-
29
-
 30
30 -
 31
31 -
 32
32 -
 33
33 -
 34
34 -
 35
35 -
 36
36 -
 37
37 -
 38
38 -
 39
39 -
 40
40 -
41
-
42
-
43
-
44
-
45
-
46
-
47
-
48
-
49
-
50
-
51
-
52
-
53
-
54
-
55
-
56
-
57
-
58
-
59
-
60
-
61
-
62
-
63
-
64
-
65
-
66
-
67
-
68
-
69
-
70
-
71
-
72
-
73
-
74
-
75
-
76
-
77
-
78
-
79
-
80
-
81
-
82
-
83
-
84
-
85
-
86
-
87
-
88
-
89
-
90
-
91
-
92
-
93
-
94
-
95
-
96
-
97
-
98
-
99
-
100
-
101
-
102
-
103
-
104
-
105
-
106
-
107
-
108
-
109
-
110
-
111
-
112
-
113
-
114
-
115
-
116
-
117
-
118
-
119
-
120
-
121
-
122
-
123
-
124
-
125
-
126
-
127
-
128
-
129
-
130
-
131
-
132
-
133
-
134
-
135
-
136
-
137
-
138
-
139
-
140
-
141
-
142
-
143
-
144
-
145
-
146
-
147
-
148
-
149
-
150
-
151
-
152
-
153
-
154
-
155
-
156
-
157
-
158
-
159
-
160
-
161
-
162
-
163
-
164
-
165
-
166
-
167
-
168
-
169
-
170
-
171
-
172
-
173
-
174
-
175
-
176
-
177
-
178
-
179
-
180
-
181
-
182
-
183
-
184
-
185
-
186
-
187
-
188
-
189
-
190
-
191
-
192
-
193
-
194
-
195
-
196
-
197
-
198
-
199
-
200
-
201
-
202
-
203
-
204
-
205
-
206
-
207
-
208
-
209
-
210
-
211
-
212
 |
 |
