Kyocera TASKalfa 620 620/820 Operation Guide (Advanced) - Page 121
Enabling Auto Cassette Switching, Machine Default, Changing, Management Code
 |
View all Kyocera TASKalfa 620 manuals
Add to My Manuals
Save this manual to your list of manuals |
Page 121 highlights
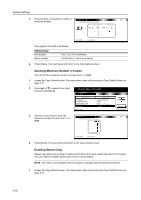
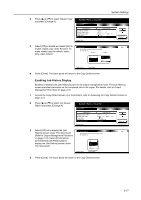
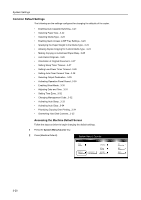
3 Use the numeric keys to enter the four-digit management code. By default, Enter the administrator numbe.r the management code is 6200 for the 62 cpm model and 8200 for the 82 cpm model. The Machine Default screen will be displayed. System Settings NOTE: For security, it is recommended to change the management code. Refer to Changing Management Code on page 3-32. When installing the optional security kit, enter the eight-digit management code. By default, the management code is 62006200 for the 62 cpm model and 82008200 for the 82 cpm model. Proceed to the following sections to customize individual settings. Enabling Auto Cassette Switching If the cassette in use runs out of paper, the copier can continue copying by automatically switching to another cassette loaded with the paper of the same size and orientation. You can specify not to switch to the cassette if the media type differs. 1 Access the Machine Default screen. (For instructions, refer to Accessing the Machine Default Screen on page 3-20.) 2 Press [S] or [T] to select Auto cassette switching and press [Change #]. System Menu / Counter Machine Default Default menu Auto cassette switching Paper size (Cassette 3) Paper size (Cassette 4) Media Type (Cassette 1) Media Type (Cassette 2) System Menu Setting mode On / All types of paper 11x 17" Auto/Inch P l ai n Re cycl e d Change # 3 Select [On] to enable automatic cassette Auto cassette switching Back switching. When paper cassette is empty, switch to another one, set same size/direction paper, and continue copying. Fu n cti o n Media Type Off All types of paper Only same On media type System Menu - Machine Default 4 To avoid switching to the cassette loaded with the different media type, press [Only same media type] under Media Type. 5 Press [Close]. The touch panel will return to the Machine Default screen. 3-21
-
 1
1 -
2
-
3
-
4
-
5
-
6
-
7
-
8
-
9
-
10
-
11
-
12
-
13
-
14
-
15
-
16
-
17
-
18
-
19
-
20
-
21
-
22
-
23
-
24
-
25
-
26
-
27
-
28
-
29
-
30
-
31
-
32
-
33
-
34
-
35
-
36
-
37
-
38
-
39
-
40
-
41
-
42
-
43
-
44
-
45
-
46
-
47
-
48
-
49
-
50
-
51
-
52
-
53
-
54
-
55
-
56
-
57
-
58
-
59
-
60
-
61
-
62
-
63
-
64
-
65
-
66
-
67
-
68
-
69
-
70
-
71
-
72
-
73
-
74
-
75
-
76
-
77
-
78
-
79
-
80
-
81
-
82
-
83
-
84
-
85
-
86
-
87
-
88
-
89
-
90
-
91
-
92
-
93
-
94
-
95
-
96
-
97
-
98
-
99
-
100
-
101
-
102
-
103
-
104
-
105
-
106
-
107
-
108
-
109
-
110
-
111
-
112
-
113
-
114
-
115
-
 116
116 -
 117
117 -
 118
118 -
 119
119 -
 120
120 -
 121
121 -
 122
122 -
 123
123 -
 124
124 -
 125
125 -
 126
126 -
127
-
128
-
129
-
130
-
131
-
132
-
133
-
134
-
135
-
136
-
137
-
138
-
139
-
140
-
141
-
142
-
143
-
144
-
145
-
146
-
147
-
148
-
149
-
150
-
151
-
152
-
153
-
154
-
155
-
156
-
157
-
158
-
159
-
160
-
161
-
162
-
163
-
164
-
165
-
166
-
167
-
168
-
169
-
170
-
171
-
172
-
173
-
174
-
175
-
176
-
177
-
178
-
179
-
180
-
181
-
182
-
183
-
184
-
185
-
186
-
187
-
188
-
189
-
190
-
191
-
192
-
193
-
194
-
195
-
196
-
197
-
198
-
199
-
200
-
201
-
202
-
203
-
204
-
205
-
206
-
207
-
208
-
209
-
210
-
211
-
212
 |
 |
