Kyocera TASKalfa 620 620/820 Operation Guide (Advanced) - Page 129
Selecting Output Destination, Destination, Description
 |
View all Kyocera TASKalfa 620 manuals
Add to My Manuals
Save this manual to your list of manuals |
Page 129 highlights
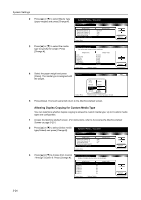
System Settings 2 Press [S] or [T] to select Auto Clear Time Setting and press [Change #]. System Menu / Counter Machine Default Default menu Special paper action mode Original Orientation Sleep mode changing time Low power mode chng. time Auto Clear Time Setting System Menu Setting mode Adjust print direction Top Edge Top 90 Minute 15 Minute 90 Seconds Change # 3 Use [+] to increase or [-] to decrease the Auto Clear Time Setting Back auto clear timeout from 10 to 270 Set the period of time from the last operatio,nafter seconds. which the default state is reverted. 90 Seconds System Menu - Machine Default 4 Press [Close]. The touch panel will return to the Machine Default screen. Selecting Output Destination You can specify the default destination for finished copies. Destination Auto Tray A Tray B Tray 1 Tray 2 Tray 3 Tray 4 Tray 5 Description Copies are sent to the empty tray. If multiple trays are empty, copies are sent to the bottom tray first and higher trays thereafter. Tray A of the document finisher. Tray B of the document finisher. This tray is not available if the multi-job tray is installed. Tray 1 (the first tray) of the multi-job tray. Tray 2 (the second tray) of the multi-job tray. Tray 3 (the third tray) of the multi-job tray. Tray 4 (the fourth tray) of the multi-job tray. Tray 5 (the fifth tray) of the multi-job tray. NOTE: This menu is available when the copier is equipped with the optional document finisher. 1 Access the Machine Default screen. (For instructions, refer to Accessing the Machine Default Screen on page 3-20.) 2 Press [S] or [T] to select Select Copy output mode and press [Change #]. System Menu / Counter Machine Default Default menu Original Orientation Sleep mode changing time Low power mode chng. time Auto Clear Time Setting Select Copy output tray System Menu Setting mode Top Edge Top 90 Minute 15 Minute 90 Seconds Tray A Change # 3-29
-
 1
1 -
2
-
3
-
4
-
5
-
6
-
7
-
8
-
9
-
10
-
11
-
12
-
13
-
14
-
15
-
16
-
17
-
18
-
19
-
20
-
21
-
22
-
23
-
24
-
25
-
26
-
27
-
28
-
29
-
30
-
31
-
32
-
33
-
34
-
35
-
36
-
37
-
38
-
39
-
40
-
41
-
42
-
43
-
44
-
45
-
46
-
47
-
48
-
49
-
50
-
51
-
52
-
53
-
54
-
55
-
56
-
57
-
58
-
59
-
60
-
61
-
62
-
63
-
64
-
65
-
66
-
67
-
68
-
69
-
70
-
71
-
72
-
73
-
74
-
75
-
76
-
77
-
78
-
79
-
80
-
81
-
82
-
83
-
84
-
85
-
86
-
87
-
88
-
89
-
90
-
91
-
92
-
93
-
94
-
95
-
96
-
97
-
98
-
99
-
100
-
101
-
102
-
103
-
104
-
105
-
106
-
107
-
108
-
109
-
110
-
111
-
112
-
113
-
114
-
115
-
116
-
117
-
118
-
119
-
120
-
121
-
122
-
123
-
 124
124 -
 125
125 -
 126
126 -
 127
127 -
 128
128 -
 129
129 -
 130
130 -
 131
131 -
 132
132 -
 133
133 -
 134
134 -
135
-
136
-
137
-
138
-
139
-
140
-
141
-
142
-
143
-
144
-
145
-
146
-
147
-
148
-
149
-
150
-
151
-
152
-
153
-
154
-
155
-
156
-
157
-
158
-
159
-
160
-
161
-
162
-
163
-
164
-
165
-
166
-
167
-
168
-
169
-
170
-
171
-
172
-
173
-
174
-
175
-
176
-
177
-
178
-
179
-
180
-
181
-
182
-
183
-
184
-
185
-
186
-
187
-
188
-
189
-
190
-
191
-
192
-
193
-
194
-
195
-
196
-
197
-
198
-
199
-
200
-
201
-
202
-
203
-
204
-
205
-
206
-
207
-
208
-
209
-
210
-
211
-
212
 |
 |
