Netgear R6250 User Manual - Page 47
File-Sharing Scenarios, Share Photos
 |
View all Netgear R6250 manuals
Add to My Manuals
Save this manual to your list of manuals |
Page 47 highlights
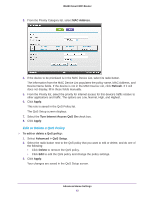
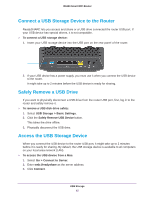
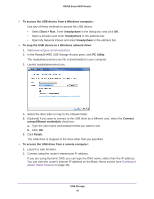
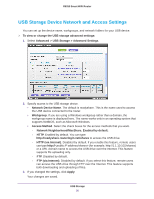
R6250 Smart WiFi Router To access the USB drive with FTP from a remote computer: 1. Make sure that the FTP check box is selected in the Access Method section of the USB Storage (Advanced Settings) screen (see USB Storage Device Network and Access Settings on page 50). 2. Launch a web browser. 3. Type ftp:// and the Internet port IP address in the address field of the browser. For example, type ftp://10.1.65.4. If you are using Dynamic DNS, you can type the DNS name rather than the IP address. 4. Type the account name and password for the account that has access rights to the USB drive. The user name (account name) for All - no password is guest. The directories of the USB drive that your account has access to display. For example, you could see: share/partition1/directory1. You can now read and copy files from the USB directory. File-Sharing Scenarios You can share files on the USB drive for a wide variety of business and recreational purposes. The files can be any Windows, Mac, or Linux file type including text, Word, PowerPoint, Excel, MP3, pictures, and multimedia files. USB drive applications include: • Sharing multimedia with friends and family such as MP3 files, pictures, and other multimedia with local and remote users. • Sharing resources on your network. You can store files in a central location so that you do not have to power up a computer to perform local sharing. In addition, you can share files between Macintosh, Linux, and Windows computers by using the USB drive as a go-between across the systems. • Sharing files such as Word documents, PowerPoint presentations, and text files with remote users. A few common uses are described in the following sections. Share Photos You can create your own central storage location for photos and multimedia. This method eliminates the need to log in to (and pay for) an external photo-sharing site. To share files with your friends and family: 1. Insert your USB drive into the USB port on the router either directly or with a USB cable. Computers on your local area network (LAN) can automatically access this USB drive using a web browser or Microsoft Networking. 2. If you want to specify read-only access or to allow access from the Internet, see USB Storage Device Network and Access Settings on page 50. USB Storage 47
-
 1
1 -
2
-
3
-
4
-
5
-
6
-
7
-
8
-
9
-
10
-
11
-
12
-
13
-
14
-
15
-
16
-
17
-
18
-
19
-
20
-
21
-
22
-
23
-
24
-
25
-
26
-
27
-
28
-
29
-
30
-
31
-
32
-
33
-
34
-
35
-
36
-
37
-
38
-
39
-
40
-
41
-
 42
42 -
 43
43 -
 44
44 -
 45
45 -
 46
46 -
 47
47 -
 48
48 -
 49
49 -
 50
50 -
 51
51 -
 52
52 -
53
-
54
-
55
-
56
-
57
-
58
-
59
-
60
-
61
-
62
-
63
-
64
-
65
-
66
-
67
-
68
-
69
-
70
-
71
-
72
-
73
-
74
-
75
-
76
-
77
-
78
-
79
-
80
-
81
-
82
-
83
-
84
-
85
-
86
-
87
-
88
-
89
-
90
-
91
-
92
-
93
-
94
-
95
-
96
-
97
-
98
-
99
-
100
-
101
-
102
-
103
-
104
-
105
-
106
-
107
-
108
-
109
-
110
-
111
-
112
-
113
-
114
-
115
-
116
-
117
-
118
-
119
-
120
-
121
-
122
-
123
-
124
-
125
-
126
-
127
-
128
-
129
 |
 |