Oki MC780f MC770/780 User Guide - Top Access - Page 199
Email settings, Setting up Email Setting, TIFF Multi, TIFF Single, XPS Multi
 |
View all Oki MC780f manuals
Add to My Manuals
Save this manual to your list of manuals |
Page 199 highlights
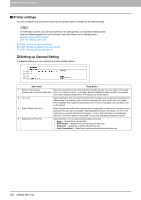
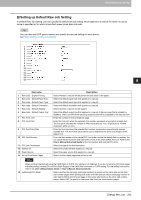
8 [Administration] Tab Page „ Email settings You can configure the E-mail settings that are needed for Scan to Email operations. This section describes necessary settings for E-mail transmissions. The [Email Setting] submenu can be accessed from the [Setup] menu on the [Administration] tab. See the following pages for how to access it and information on the [Setup] menu: P.22 "Access Policy Mode" P.136 "[Setup] Item List" Some settings may not be reflected on the touch panel immediately after saving them. The settings will be updated by pressing the [RESET] button on the control panel or after an Auto Clear time period. ‰ Setting up Email Setting You can specify the file format, fragment message size, and default body strings that apply to the Scan to Email documents. 1 2 3 4 5 6 7 8 9 10 1112 13 14 15 Item name 1 From Address Description Enter the E-mail address of this equipment. The [From Address] must be entered to enable E-mail transmission. However, the E-mail address of the user who is logged in to this equipment will be automatically set if any user management settings apart from MFP local authentication are enabled. For more information about User Management Setting, see the following section: P.135 "[Administration] Tab Page" 2 From Name Enter the name of this equipment. 3 Message Header (Inbound FAX Routing) Select TTI to be used as a subject when the received Internet Fax is forwarded. 4 File Format(Black) Select the file format of files to be sent when scanning in black mode. y TIFF (Multi) - Select this to save scanned images as a Multi-page TIFF file. y TIFF (Single) - Select this to save scanned images separately as Single-page TIFF files. y PDF (Multi) - Select this to save scanned images as a Multi-page PDF file. y PDF (Single) - Select this to save scanned images separately as Single-page PDF files. y XPS (Multi) - Select this to save scanned images as a Multi-page XPS file. y XPS (Single) - Select this to save scanned images separately as Single-page XPS files. 198 [Setup] Item List
-
 1
1 -
2
-
3
-
4
-
5
-
6
-
7
-
8
-
9
-
10
-
11
-
12
-
13
-
14
-
15
-
16
-
17
-
18
-
19
-
20
-
21
-
22
-
23
-
24
-
25
-
26
-
27
-
28
-
29
-
30
-
31
-
32
-
33
-
34
-
35
-
36
-
37
-
38
-
39
-
40
-
41
-
42
-
43
-
44
-
45
-
46
-
47
-
48
-
49
-
50
-
51
-
52
-
53
-
54
-
55
-
56
-
57
-
58
-
59
-
60
-
61
-
62
-
63
-
64
-
65
-
66
-
67
-
68
-
69
-
70
-
71
-
72
-
73
-
74
-
75
-
76
-
77
-
78
-
79
-
80
-
81
-
82
-
83
-
84
-
85
-
86
-
87
-
88
-
89
-
90
-
91
-
92
-
93
-
94
-
95
-
96
-
97
-
98
-
99
-
100
-
101
-
102
-
103
-
104
-
105
-
106
-
107
-
108
-
109
-
110
-
111
-
112
-
113
-
114
-
115
-
116
-
117
-
118
-
119
-
120
-
121
-
122
-
123
-
124
-
125
-
126
-
127
-
128
-
129
-
130
-
131
-
132
-
133
-
134
-
135
-
136
-
137
-
138
-
139
-
140
-
141
-
142
-
143
-
144
-
145
-
146
-
147
-
148
-
149
-
150
-
151
-
152
-
153
-
154
-
155
-
156
-
157
-
158
-
159
-
160
-
161
-
162
-
163
-
164
-
165
-
166
-
167
-
168
-
169
-
170
-
171
-
172
-
173
-
174
-
175
-
176
-
177
-
178
-
179
-
180
-
181
-
182
-
183
-
184
-
185
-
186
-
187
-
188
-
189
-
190
-
191
-
192
-
193
-
 194
194 -
 195
195 -
 196
196 -
 197
197 -
 198
198 -
 199
199 -
 200
200 -
 201
201 -
 202
202 -
 203
203 -
 204
204 -
205
-
206
-
207
-
208
-
209
-
210
-
211
-
212
-
213
-
214
-
215
-
216
-
217
-
218
-
219
-
220
-
221
-
222
-
223
-
224
-
225
-
226
-
227
-
228
-
229
-
230
-
231
-
232
-
233
-
234
-
235
-
236
-
237
-
238
-
239
-
240
-
241
-
242
-
243
-
244
-
245
-
246
-
247
-
248
-
249
-
250
-
251
-
252
-
253
-
254
-
255
-
256
-
257
-
258
-
259
-
260
-
261
-
262
-
263
-
264
-
265
-
266
-
267
-
268
-
269
-
270
-
271
-
272
-
273
-
274
-
275
-
276
-
277
-
278
-
279
-
280
-
281
-
282
-
283
-
284
-
285
-
286
-
287
-
288
-
289
-
290
-
291
-
292
-
293
-
294
-
295
-
296
-
297
-
298
-
299
-
300
-
301
-
302
-
303
-
304
-
305
-
306
-
307
-
308
-
309
-
310
-
311
-
312
-
313
-
314
-
315
-
316
-
317
-
318
-
319
-
320
-
321
-
322
-
323
-
324
-
325
-
326
-
327
-
328
-
329
-
330
-
331
-
332
-
333
-
334
-
335
-
336
-
337
-
338
-
339
-
340
-
341
-
342
-
343
-
344
-
345
-
346
-
347
-
348
-
349
-
350
-
351
-
352
-
353
-
354
-
355
-
356
-
357
-
358
-
359
-
360
-
361
-
362
-
363
-
364
-
365
-
366
-
367
-
368
-
369
-
370
-
371
-
372
-
373
-
374
-
375
-
376
-
377
-
378
-
379
-
380
 |
 |
