Oki MC780f MC770/780 User Guide - Top Access - Page 200
TIFF Multi, TIFF Single, Slim PDF Multi, Slim PDF Single, XPS Multi, Factory Default, <Entry box>
 |
View all Oki MC780f manuals
Add to My Manuals
Save this manual to your list of manuals |
Page 200 highlights
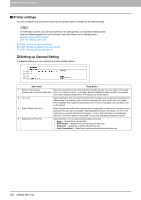
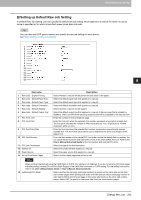
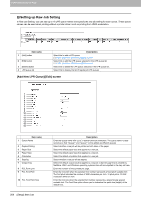
8.[Administration] Tab Page 8 [Administration] Tab Page Item name 5 File Format(Color) Description Select the file format of files to be sent when scanning in color mode. y TIFF (Multi) - Select this to save scanned images as a Multi-page TIFF file. y TIFF (Single) - Select this to save scanned images separately as Single-page TIFF files. y PDF (Multi) - Select this to save scanned images as a Multi-page PDF file. y PDF (Single) - Select this to save scanned images separately as Single-page PDF files. y Slim PDF (Multi) - Select this to save scanned images as Multi-page slim PDF files. Select this when you give priority to minimizing the file size over quality of image. y Slim PDF (Single) - Select this to save scanned images separately as Single-page slim PDF files. Select this when you give priority to minimizing the file size over quality of image. y XPS (Multi) - Select this to save scanned images as a Multi-page XPS file. y XPS (Single) - Select this to save scanned images separately as Single-page XPS files. y JPEG - Select this to save scanned images as JPEG files. Files saved in an XPS format can be used in Windows Vista/Windows 7/Windows Server 2008 SP1, or Windows XP SP2/ Windows Server 2003 SP1 or later versions with Net Framework 3.0 installed. 6 Number of Retry Enter the number of times to try sending scanned images when it fails. "3" is set as the default. 7 Retry interval Enter the interval to try sending scanned images when it fails. [1minutes] is set as the default. When the [Number of Retry] and [Retry interval] options are changed, the [Number of Retry] and [Retry interval] options in the Internet Fax settings are also changed. P.200 "Setting up InternetFax Setting" 8 Fragment Message Size Select the size of the message fragmentation. 9 Default Subject Select whether to set the E-mail subject to the factory default or a desired string. y Factory Default - Select this to display the BCC address entry column. y - Enter the desired subject. 10 Add the date and time to the Subject Select whether to append or not date and time to the E-mail subject. This is set as a default. y Enable - Select this to append date and time to the subject. y Disable - Select this to not append date and time to the subject. 11 Editing of Subject Select whether to allow or not editing of the E-mail subject. y Enable - Select this to allow the user to edit the E-mail subject. y Disable - Select this to not allow the user to edit the E-mail subject. 12 Default Body Strings Enter the body text that will be automatically entered in the [Body] box when users operate Scan to Email from the touch panel. This sets only the default body text, so that it can be changed on each operation by users. 13 Body Strings Transmission Select whether the body strings will be sent or not. 14 BCC Address Display Select whether or not to display the BCC address entry column. y ON - Select this to display the BCC address entry column. y OFF - Select this not to display the BCC address entry column. 15 From Address cannot be edited in Select this item to prohibit modification of the From Address. Scan to Email. [Setup] Item List 199
-
 1
1 -
2
-
3
-
4
-
5
-
6
-
7
-
8
-
9
-
10
-
11
-
12
-
13
-
14
-
15
-
16
-
17
-
18
-
19
-
20
-
21
-
22
-
23
-
24
-
25
-
26
-
27
-
28
-
29
-
30
-
31
-
32
-
33
-
34
-
35
-
36
-
37
-
38
-
39
-
40
-
41
-
42
-
43
-
44
-
45
-
46
-
47
-
48
-
49
-
50
-
51
-
52
-
53
-
54
-
55
-
56
-
57
-
58
-
59
-
60
-
61
-
62
-
63
-
64
-
65
-
66
-
67
-
68
-
69
-
70
-
71
-
72
-
73
-
74
-
75
-
76
-
77
-
78
-
79
-
80
-
81
-
82
-
83
-
84
-
85
-
86
-
87
-
88
-
89
-
90
-
91
-
92
-
93
-
94
-
95
-
96
-
97
-
98
-
99
-
100
-
101
-
102
-
103
-
104
-
105
-
106
-
107
-
108
-
109
-
110
-
111
-
112
-
113
-
114
-
115
-
116
-
117
-
118
-
119
-
120
-
121
-
122
-
123
-
124
-
125
-
126
-
127
-
128
-
129
-
130
-
131
-
132
-
133
-
134
-
135
-
136
-
137
-
138
-
139
-
140
-
141
-
142
-
143
-
144
-
145
-
146
-
147
-
148
-
149
-
150
-
151
-
152
-
153
-
154
-
155
-
156
-
157
-
158
-
159
-
160
-
161
-
162
-
163
-
164
-
165
-
166
-
167
-
168
-
169
-
170
-
171
-
172
-
173
-
174
-
175
-
176
-
177
-
178
-
179
-
180
-
181
-
182
-
183
-
184
-
185
-
186
-
187
-
188
-
189
-
190
-
191
-
192
-
193
-
194
-
 195
195 -
 196
196 -
 197
197 -
 198
198 -
 199
199 -
 200
200 -
 201
201 -
 202
202 -
 203
203 -
 204
204 -
 205
205 -
206
-
207
-
208
-
209
-
210
-
211
-
212
-
213
-
214
-
215
-
216
-
217
-
218
-
219
-
220
-
221
-
222
-
223
-
224
-
225
-
226
-
227
-
228
-
229
-
230
-
231
-
232
-
233
-
234
-
235
-
236
-
237
-
238
-
239
-
240
-
241
-
242
-
243
-
244
-
245
-
246
-
247
-
248
-
249
-
250
-
251
-
252
-
253
-
254
-
255
-
256
-
257
-
258
-
259
-
260
-
261
-
262
-
263
-
264
-
265
-
266
-
267
-
268
-
269
-
270
-
271
-
272
-
273
-
274
-
275
-
276
-
277
-
278
-
279
-
280
-
281
-
282
-
283
-
284
-
285
-
286
-
287
-
288
-
289
-
290
-
291
-
292
-
293
-
294
-
295
-
296
-
297
-
298
-
299
-
300
-
301
-
302
-
303
-
304
-
305
-
306
-
307
-
308
-
309
-
310
-
311
-
312
-
313
-
314
-
315
-
316
-
317
-
318
-
319
-
320
-
321
-
322
-
323
-
324
-
325
-
326
-
327
-
328
-
329
-
330
-
331
-
332
-
333
-
334
-
335
-
336
-
337
-
338
-
339
-
340
-
341
-
342
-
343
-
344
-
345
-
346
-
347
-
348
-
349
-
350
-
351
-
352
-
353
-
354
-
355
-
356
-
357
-
358
-
359
-
360
-
361
-
362
-
363
-
364
-
365
-
366
-
367
-
368
-
369
-
370
-
371
-
372
-
373
-
374
-
375
-
376
-
377
-
378
-
379
-
380
 |
 |
