Panasonic AW-HE130 Operating Instructions - Page 27
Selecting the shooting modes (scene files), Types of shooting modes, How to select the shooting mode
 |
View all Panasonic AW-HE130 manuals
Add to My Manuals
Save this manual to your list of manuals |
Page 27 highlights
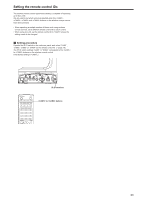
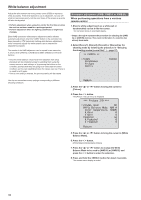
Selecting the shooting modes (scene files) Types of shooting modes One of four shooting modes (Scene1, Scene2, Scene3 or Scene4) - whichever one will best suit the shooting conditions - can be selected. The shooting modes are set by the user. For details of the factory settings, refer to pages 61 to 63. Select the mode that satisfies the shooting conditions and suits your preferences. The settings can be changed by menu operations. • The results of the white balance and other adjustments are stored in the memory separately by shooting mode. Be absolutely sure to select the shooting mode before making any adjustments. • Some of the initial settings are auto settings and cannot be operated manually. To operate them manually, switch from the auto settings to the manual settings as required. Scene1 Scene2 Scene3 Scene4 The settings of your preferences can be established in line with the shooting scene, lighting and other conditions. How to select the shooting mode When performing operations from a wireless remote control 2, 8 1 4. Press the button. The [Camera] sub‑menu is displayed on the monitor. Camera Scene Brightness Picture Matrix Scene1 Return 5. Press the or button to bring the cursor to [Scene]. 6. Press the button. The shooting mode blinks. 7. Press the or button to select the shooting mode (Scene1, Scene2, Scene3 or Scene4) to be used, and press the button to enter the selection. 8. Press and hold the button for about 2 seconds. The camera menu display is exited. When performing operations from a controller When using a AW-RP50, AW-RP120, or AK-HRP200 Refer to the operating instructions for the controller. 3, 5, 7 4, 6, 7 1. Press the , , or button to select the unit. 2. Press and hold the button for about 2 seconds. The Top Menu is displayed. Top Menu Camera Scene: Scene1 System Maintenance 3. Press the or button to bring the cursor to [Camera]. 27
-
 1
1 -
2
-
3
-
4
-
5
-
6
-
7
-
8
-
9
-
10
-
11
-
12
-
13
-
14
-
15
-
16
-
17
-
18
-
19
-
20
-
21
-
 22
22 -
 23
23 -
 24
24 -
 25
25 -
 26
26 -
 27
27 -
 28
28 -
 29
29 -
 30
30 -
 31
31 -
 32
32 -
33
-
34
-
35
-
36
-
37
-
38
-
39
-
40
-
41
-
42
-
43
-
44
-
45
-
46
-
47
-
48
-
49
-
50
-
51
-
52
-
53
-
54
-
55
-
56
-
57
-
58
-
59
-
60
-
61
-
62
-
63
-
64
-
65
-
66
-
67
-
68
-
69
-
70
-
71
-
72
-
73
-
74
-
75
-
76
-
77
-
78
-
79
-
80
-
81
-
82
-
83
-
84
-
85
-
86
-
87
-
88
-
89
-
90
-
91
-
92
-
93
-
94
-
95
-
96
-
97
-
98
-
99
-
100
-
101
-
102
-
103
-
104
-
105
-
106
-
107
-
108
-
109
-
110
-
111
-
112
-
113
-
114
-
115
-
116
-
117
-
118
-
119
-
120
-
121
-
122
-
123
-
124
-
125
-
126
 |
 |
